
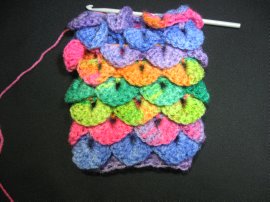
This Crochet Finger less Crochet Gloves Free pattern and tutorial will teach you how to make the crocodile stitch and how to make Crocheted Fingerless gloves using it. It’s a simple two row repeat.
You can find more things like this under the category Fingerless Gloves
This stitch is also used in the Pattern & tutorials for:
Crocodile Stitch Finger less Gloves – Free Crochet Pattern
Please don’t forget to Pin this onto your favorite crochet boards!
This page contains affiliate links

For this project you will need:
- HOOK: 5 mm hook or size H hook for the US
- YARN: 2 skeins of worsted weight yarn, 4 ply US, 10 ply AU – 100 grams / 3.5. oz – 240 meters / 262 yards
- Tapestry Needle to hide your tails
ABBREVIATIONS
(click on link to find tutorials)
ch = Chain
sl st = Slip Stitch
st = Stitch
sk = Skip
SC = Single Crochet
DC = Double Crochet
Sc dec = single crochet decrease
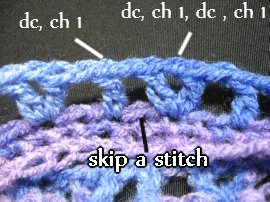
V st – DC, ch 1, DC , ch 1

PDF Pattern with Pictures
You can find the PDF version of my pattern with pictures on Ravlery Or my shop on Etsy. Thank you very much for all you do to support my channel.
THE VIDEO TUTORIALS:
All my Video Tutorials
If you haven’t yet, take a moment to subscribe to my videos on YouTube to have easy access to all my videos and playlist @meladora1 on YouTube

Multiples of the stitch
The multiples of this stitch is 4
To Start
ch 24 and sl st into beginning ch to form a ring.
TIP: The Crocodile Stitch
makes the gloves much bigger on the hand and feels loose, so if you can get your
hand through a chain of 20 it’s much better.
Rounds 1
Ch 1 and sc in the first ch space that you just slip stitched into. Place marker here. Crochet 1 SC into all sts around, at the end of round just continue and
Round 2
sc in the first SC where you placed your marker. Crochet 1 SC into all sts around, at the end of round
sl st in beginning st. (24 sts)
This next round is called the Prep row, It’s needed so that you can make the scales next round.
Round 3 – Prep Row
ch 3, DC into same st, ch 1, * sk a st, DC 1, ch 1, sk a st , and V st in next st (DC, ch 1, DC , ch 1)* repeat until you get to the last stitch, which should be a skipped stitch and then sl st into 2nd ch of beginning ch3.
Round 4
ch 1 and * DC 5 down the post of the first ch 2, then going up the next post of the following DC, you want to DC 5 down the post of your ch 3 from last round.

Sl st onto the post of the following single DC to anchor your scale. *
repeat sl st into the stitch (not to post) of the last DC of the round.
Round 5 – Prep Row – 1st row of repeat
ch 3, DC into the same beginning stitch, ch 1, * DC into the center of the crocodile scale, ch 1, and V st into the stitch of the DC from the last round that you used as an anchor. * (The DC’s in between the crocodile scales) repeat , sl st into 2nd ch of beginning ch 3.
Round 6 – 2nd row of repeat
ch 1 and * DC 5 down the post of the first ch 2, then going up the next post of the following dc, you want to dc 5 down the post of your ch 3 from last round. Sl st
onto the post of the following single dc. * repeat sl st into the stitch of the last dc of the round.
Repeat rounds 5 and 6 until you have 8 total rows of crocodile stitches done. You you end after row 20 or if your making it a longer glove, then just make sure you end after a scale row and not a prep row.
Round 21
Make sure you have a marker here. As you see by the picture below, we’ll be using the side post’s of our DC from our scales to put a sc into this round. Also you’ll be using the st in the center of our scales and the single DC’s we have in between our scales.
Remember the multiples of this stitch is 4. (24 sts)
ch 1, SC into the same st. * Sc into the first side stitch of the scale. SC in center stitch of the scales, SC in the next side st of the scale. SC in the st of the DC. * repeat for round until you reach your marker. St st in marker st to end round
MAKING THE THUMB
Round 22 – thumb
ch 5, sk 2 sts, * DC in next st. Stick your finger in the hole to make sure your finger fits. If it’s too small, ripe out your DC and ch one more before DCing in next st. But keep in mind this pattern is still written out for just a ch of 5. Once you have it the size you need then continue.
Ch 1, sk a st and V st in next st. (DC 1, ch 1, DC 1) sk a st, DC and ch 1 in next st.* repeat.
You are creating another prep row here. Continue round until you reach your beginning stitch of ch 5. Your should have 2 sts to skip before the sl where you began your ch 5. You want to skip those 2 sts as normal and going using the bottom ch, sc into it continue
Round 23
and sc into the remaining 4 chs.
Sc into the 1st DC. Continue the round as normal making your scales.
* DC 5 down the post of the first ch 2, then going up the next post of the following dc, you want to dc 5 down the post of your ch 3 from last round. Sl st
onto the post of the following single dc. * repeat around until you reach your marker again.
Round 24
Along the beginning ch 5 work a sc dec, sc dec, using the next 4 sc’s.
Then sc in the next sc, then * V st and ch 1 into the next st, sk a st, dc 1, ch 1 in next st. sk a st * repeat until you reach your beginning sc decreases where your thumb begins.
Thumb –
Skip the 1st sc for thumb and DC, ch 1, DC ch 1 in next st. Skip next st and DC 1 and ch 1 in next st which brings you up to your 1st V st. Using the 1st DC of your V st, sl st in DC to end your round.
Round 25
ch 1, and go right back into that same st you just sl stitched and SC. sc in all sts around like you did for round 21 – sc in center of scales, sc in
dc side stitches , sc in dc.
Once you reach your marker again just continue…
Rounds 26 – 28
continue and sc in all sts around, after round 28, skip the last stitch and sl st into
beginning st and ch 1, cut yarn. Leaving enough of a tail to be worked in with a
tapestry needle.
This pattern is brought to you by www.meladorascreations.com
You can sell any item made from this pattern and link back to my page or videos, but you do not have permission to copy and paste my pattern anywhere online. ©Copyright 2023, All Rights Reserved
PLEASE READ BELOW!
If you’d like to see my channel stay and grow, please consider becoming a patron.
Or you could make a one time donation through PayPal. Thank you so much for your support! God Bless!