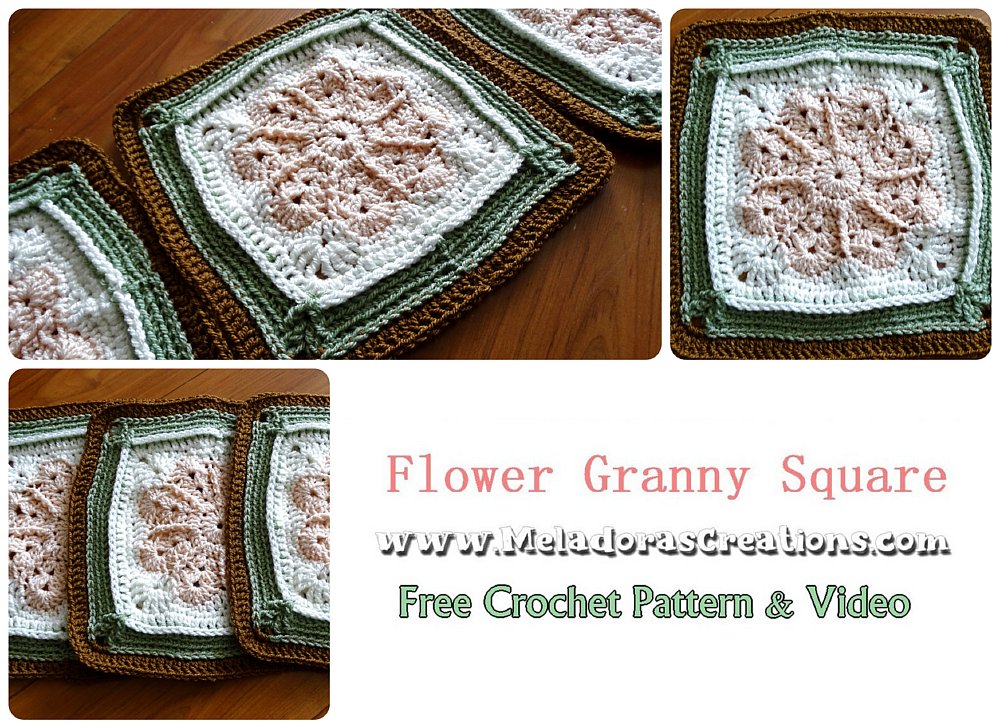
This Flower Granny Square is 12 inches of beauty! I’ve made a flower granny in the past, but it was with a 3D flower, but I’ve always wanted to make one with a flat flower. I had almost given up, I was having trouble turning it into a square, but I pushed through and finally figured it out!
For the rest of the square I wanted to make it simple and warm. I didn’t want any big holes since the flower itself had enough of them.
I’ve been waiting to share this with you! This granny is part of Moogly’s 2022 granny square CAL! Go see the post on her page here!
Find more crochet patterns like this here on my site on the category Granny Squares
Flower Granny Square – Free crochet pattern
Please don’t forget to Pin this onto your favorite crochet boards!
This page contains affiliate links

For this project you will need:
- HOOK: 6 mm hook or size J hook for the US
- YARN: Worsted weight yarn, 4 ply US, 10 ply AU
I used 4 colors for this square. I only had a half a skien of the pink and I was able to make 3 grannies with it, so I’m guessing you could make 6 squares per skein as long as you use 4 colors or more.
I had Full skeins of the brown and green and I barley used any of it, so you’d need even less of it. The flower seems to take the most yarn.
This is a 12 inch / 30 ½ cm Square.
ABBREVIATIONS
(click on link to find tutorials)
ch = Chain
sl st = Slip Stitch
sk a st = Skip a stitch
sts = Stitches
SC = Single Crochet
DC = Double Crochet
HDC = Half Double Crochet
TRC = Triple Crochet
BPSC = Back post Single Crochet
FPDC = Front Post Double Crochet
BPDC = Back Post Double Crochet
beg = beginning
YO = Yarn over
BLO = Back Loop Only
Repeat what’s in between * for rest of row.
PDF Pattern with Pictures
You can find the PDF version of my pattern with pictures on Ravlery Or my shop on Etsy. Thank you very much for all you do to support my channel.

There are many ways to connect granny squares, but this pattern will not be showing how to do this. This pattern will show you how to make the square only.
I’ll be referring to the colors I used in my Square that’s featured here.
- First Color = Pink
- Second Color = Off White
- Third Color = Green
- Fourth Color = Brown
I bought my yarn in an Israeli yarn shop and as far as I know they can’t be ordered online. Sorry guys!

THE VIDEO TUTORIALS:
All my Video Tutorials
If you haven’t yet, take a moment to subscribe to my videos on YouTube to have easy access to all my videos and playlist @meladora1 on YouTube
The Pattern:
To Start – With your First Color (pink)
Ch 3 and sl st in beg ch to form a ring.
Round 1
Ch 2 and DC 15 into ring. (16 sts)
sl st in beg ch 2 to end round.
Round 2
ch 2 and DC into same st. DC 2 in all stitches (32 sts)
Round 3
Ch 2 (the ch 2 does not count as a stitch) and FPDC onto the ch 2 from previous round.
*Sk a st and DC 2, ch 1, DC 2 into next st.
Sk a st and FPDC onto next st post. *
repeat for round. This should give you 8 petals.
Sl st in beg FPDC to end your round.
Round 4
Ch 2 (the ch 2 does not count as a stitch) and FPDC onto the FPDC.
*sk 2 sts to reach the ch 1 space in the center of the petal. DC 3, ch 1 DC 3 into that ch 1 space. Then skip over and FPDC into the FPDC. *
repeat for round. Sl st in beg FPDC to end your round.
Round 5
Ch 2 (the ch 2 does not count as a stitch) and FPDC onto the FPDC.
*sk 2 sts to reach the ch 1 space in the center of the petal. DC 4, ch 1 DC 4 into that ch 1 space. Then skip over and FPDC into the FPDC. *
repeat for round. Sl st in beg FPDC to end your round.

Round 6 – Change to Second Color (Off White)
Ch 2 – the ch 2 WILL count as a stitch this round.
DC in next stitch.
*HDC in next st. SC in next 2 stitch and ch 1,
Skip over the ch 1 space and SC in the next 2 sts.
HDC in next stitch. DC in the next 3 stitches*
repeat for the round. Sl st in beg ch 2 to end round.
Round 7
Ch 1 and sc in the top of the beg ch 2.
SC in the next 4 sts. Sk the ch 1 space.
*SC in the next 2 sts. Sk 2 sts.
TRC 3, ch 1, TRC 3 into the next st. (in middle DC)
Sk 2 sts. SC in the next 2 sts.
Sk the ch 1 space and SC in next 9 sts.
Sk the ch 1 space. * (you should have 13 sc’s in total)
Repeat for round. Sl st in beg sc to end round.
Round 8
Ch 2 and DC into the same stitch. DC into the next 9 sts.
*DC 2, Ch 1, DC 2 in ch 1 corner space.
DC into the next 9 sts.
DC 2 in next space
DC into the next 9 sts. (20 DC’s in a row for each side)
Repeat for round. Sl st in beg Ch 2 to end round.
Round 9 – Change to Third color (green)
Ch 2 (the ch 2 does not count as a stitch) and BPDC onto the ch 2 from previous round.
BPDC on the next 12 sts until you reach the corner.
*DC 1, ch 1, DC 1 into corner ch 1 space.
BPDC on the next 24 sts. * repeat for all sides
On 1st side BPDC in the last 11 sts. Then sl st into the beg BPDC (not the ch 2) to end your round.
Round 10
Ch 1 and SC in BLO of the first sc.
Continue and SC in the BLO of the next 12 sts. (total 13)
*FPDC on 1st DC of corner,
DC 1, ch 1 DC 1 in the ch 1 space
then FPDC on next DC.
SC in BLO of the next 24 sts* Repeat for the other 3 sides.
On last side to finish: Sc in BLO of next 11 sts to beg st then sl st in beg SC to end round.
Round 11
Ch 1 and SC in BLO in the next 14 sts until you reach corner.
*FPDC on the 1st DC in the corner. DC 1, ch 1, DC 1. FPDC on 2nd DC after corner. SC in BLO in the next 26 sts. * repeat for the other 3 sides.
On last side to finish: Sc in BLO of next 12 sts to beg st then sl st in beg SC to end round.
Round 12 Change to Fourth Color (Brown)
Ch 1 and BPSC on first SC. BPSC in next 15 sts to corner (total of 16 sts before corner)
*SC, CH 2, SC in corner ch 1 space
BPSC in next 30 sts until corner * repeat for round.
On last side to finish: BPSC in last 15 sts. Sl st in beg sc to end round.
Round 13
Ch 2 – the ch 2 WILL count as a stitch DC in the next 16 sts until corner.
*DC , CH 2, DC in corner. DC in the next 33 sts * Repeat for round.
On last side to finish: DC in last 16 sts. Sl st in beg CH 2 to end round.
This pattern is brought to you by www.meladorascreations.com
You can sell any item made from this pattern and link back to my page or videos, but you do not have permission to copy and paste my pattern anywhere online. ©Copyright 2022, All Rights Reserved
PLEASE READ BELOW!
If you’d like to see my channel stay and grow, please consider becoming a patron.
Or you could make a one time donation through PayPal. Thank you so much for your support! God Bless!