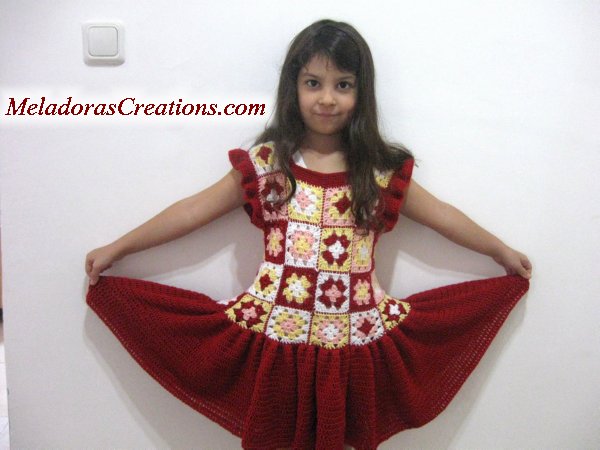
This Boho crochet granny square dress was made to spin! This was an order from my daughter! hehe She still tells me 5 years later that this was her favorite dress that I ever made her.
You can find more things like this under the category Crochet for Children
Boho Chic Dress Tutorial – Granny Square Spinning Dress – Free Crochet pattern, pictorial and video tutorial
Please don’t forget to Pin this onto your favorite crochet boards!
This page contains affiliate links

For this project you will need:
- HOOK: 3 mm, size 11 for the UK, or size D for the US
- YARN: 3 ply for the US , 10 ply for AU
The type of yarn I used was microfiber Acrylic. It’s a softer yarn.
Each skein was:
- 100 grams / 3.5. oz
- 260 meters / 284 yards
My daughter is about a size 12 which is a size 15 in the US
I used 4 colors. 1 of those colors needs to be chosen as the main color. For my dress I chose Red. The 4 colors I chose were Red, Pink, White and Yellow.
Since you will be picking your own colors I am going just tell you when to CHANGE COLORS in the pattern.
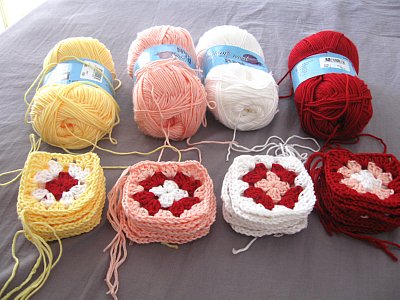
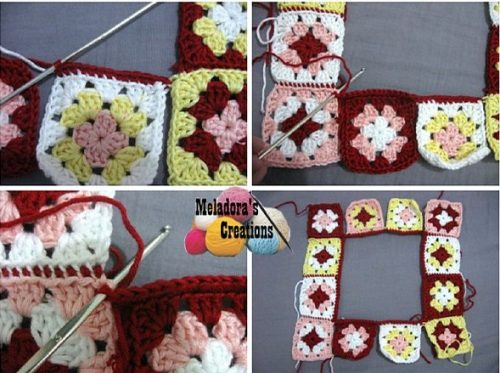
Using each color as the border, I would mix the colors in the center. I got 6 different granny squares for each border color as seen in this picture. You will need to make a total of 42 grannies.
ABBREVIATIONS
(click on link to find tutorials)
ch = Chain
sl st = Slip Stitch
st = Stitch
sk = Skip
beg = beginning
YO = Yarn Over
SC = Single Crochet
DC = Double Crochet
Repeat what’s in between * for rest of round.
THE VIDEO TUTORIALS:
All my Video Tutorials
If you haven’t yet, take a moment to subscribe to my videos on YouTube to have easy access to all my videos and playlist @meladora1 on YouTube
PDF Pattern with Pictures
You can buy the ad free PDF version of my pattern with pictures on Ravelry to support this channel. Either way thank you for being here and for all you do to support my channel.
MAKING THE GRANNY SQUARES
To Start
ch 4 and sl st in beg st.
Round 1
Ch 3, work two more dc’s inside the ring, *(ch 2, then work 3 more dc’s into the ring)* repeat this 2 more times. After the last set of 3 dc’s, only ch 1 instead of 2 and sl st into top of beginning ch 3. This sl st counts as second chain. This is why you only chained one at end or row. You should have you 4 spaces.
Round 2 CHANGE COLORS
Ch 3, work two more dc’s into this corner space. (ch 2 and working in the next corner space put DC 3, ch 2, DC 3 all worked in the same space. ) repeat 2 more times, which brings you up to your beginning corner. DC into this last space ch 1 and sl st into beginning ch 3.
Round 3 CHANGE COLORS
Ch 3, work two more dc’s into this corner space. (Ch 1 and dc 3 into middle space, ch 1 and working in next corner DC 3. ch 2. DC 3. ) repeat 2 more times, which brings you up to your beginning corner. DC into this last space ch 1 and sl st into beginning ch 3. Cut your yarn leaving a long tail to work in with a tapestry needle. Do not take the short cut and try to crochet over your tails. Take the time to do it right or you’ll regret it later.
PUTTING YOUR TOP TOGETHER
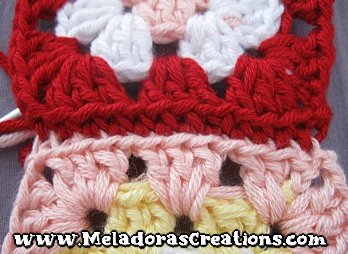
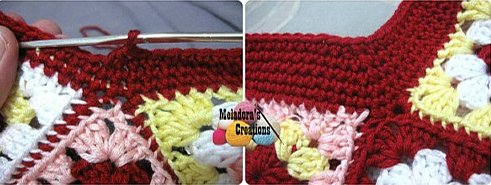
To connect the granny squares, you will be using the back loops only. Make sure you have the right side (or good side) facing one another. Then starting from one corner chain to the next corner chain, sc the pieces together.
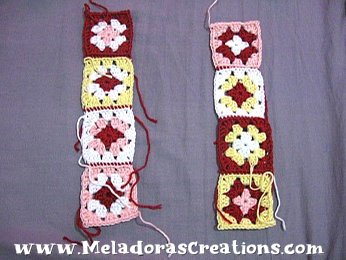
It’s best to start this top piece by making the straps first. Make 2 straps of 4 grannies.
Then place two grannies in between the top and bottom to form a square. And work your way around single crocheting them together using the same method as shown before until your square is connected. This is going to be your neck hole.
Then fold your piece in half and sew the next row of grannies. But this time you will need to add a granny to the end giving you a total of 10 grannies this row.
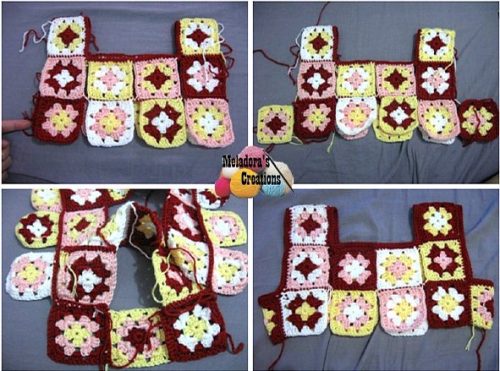
The end grannies are the sides of the top.
Repeat this for two more rows.
Then you need to turn your piece inside out. Hide all the tails you have up to this point! Then start to sew your pieces together the other direction.
Take one row at a time. Single crocheting the pieces together and when you come to a crossroads where you met your sewing job going the other direction. Just sl st or single crochet to bring yourself on top of it, and continue to sew the next grannies as before.
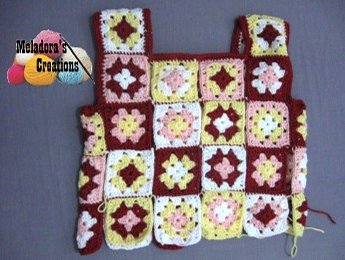
COLLAR OF THE DRESS
Attach your yarn back to the top where you connected your grannies to form the neck. The connection round counted as one round of single crochets, so lets continue from there.
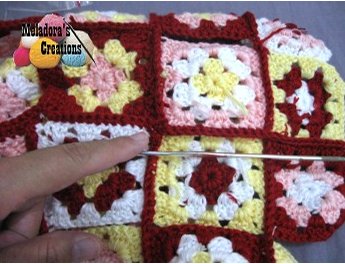
Rounds 2 and 3
SC in all stitches around
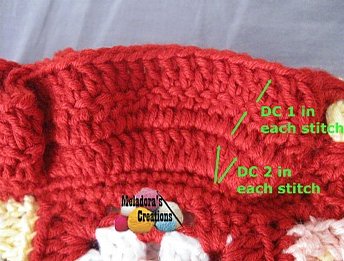
Rounds 4 – 6 (for 3 rounds)
SC in all stitches until you get to a corner, doesn’t matter exactly where in the corner, just in the corner do a single crochet decrease. SC to the next corner and repeat. You have 4 corners so you will be doing this 4 times for the next 3 rounds.
THE SLEEVES
Attach your yarn on one corner. You will be working back and forth in rows on the sleeves. Because you want to leave the bottom square un-worked.
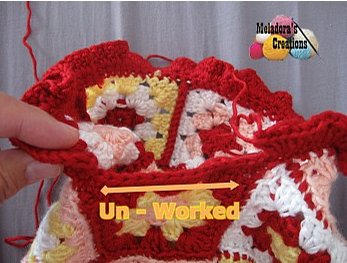
Row 1
Dc 2 in all stitches. turn
Rows 2 and 3
ch 3 and dc 1 in all stitches. Turn
SKIRT OF DRESS
Round 1
Attach your yarn by single crochet method, or sl st and ch 1 and sc in first stitch. * sc in all stitches around.* repeat for round. Sl st in beginning sc.
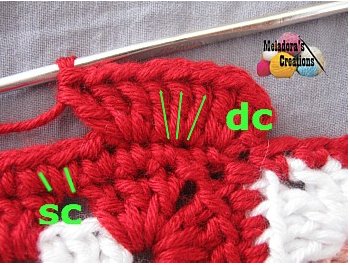
Round 2
ch 3 and work 2 more DC’s into the same stitch. *DC 3 stitches in next stitch* repeat for round. Sl st int beginning ch 3.
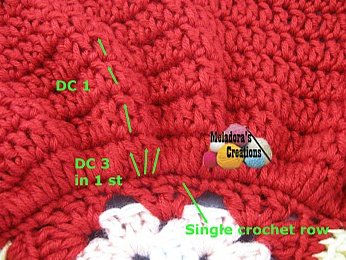
Round 3 – ?
ch 3 and DC 1 into next stitch, put 1 DC in all sts around. Sl st in beginning ch 3 to end the round.
I worked a total of 20 rows of dc’s, this number includes round 2.
Skirt measures 22 cms or 8 ½ inches. Feel free to make yours as long or short as you want.
This pattern is brought to you by www.meladorascreations.com
You can sell any item made from this pattern and link back to my page or videos, but you do not have permission to copy and paste my pattern anywhere online. ©Copyright 2024, All Rights Reserved
PLEASE READ BELOW!
If you’d like to see my channel stay and grow, please consider becoming a patron.
Or you could make a one time donation through PayPal. Thank you so much for your support! God Bless!