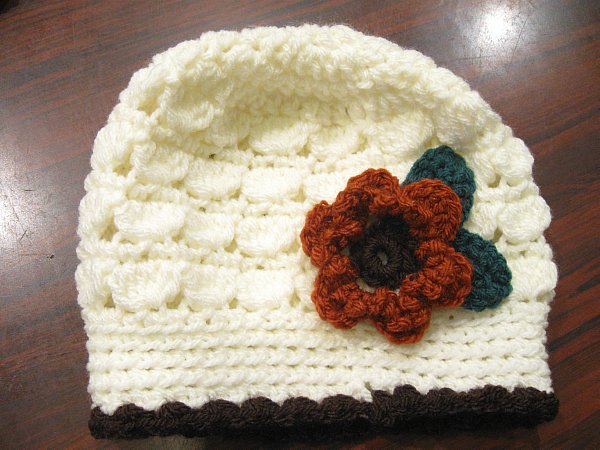
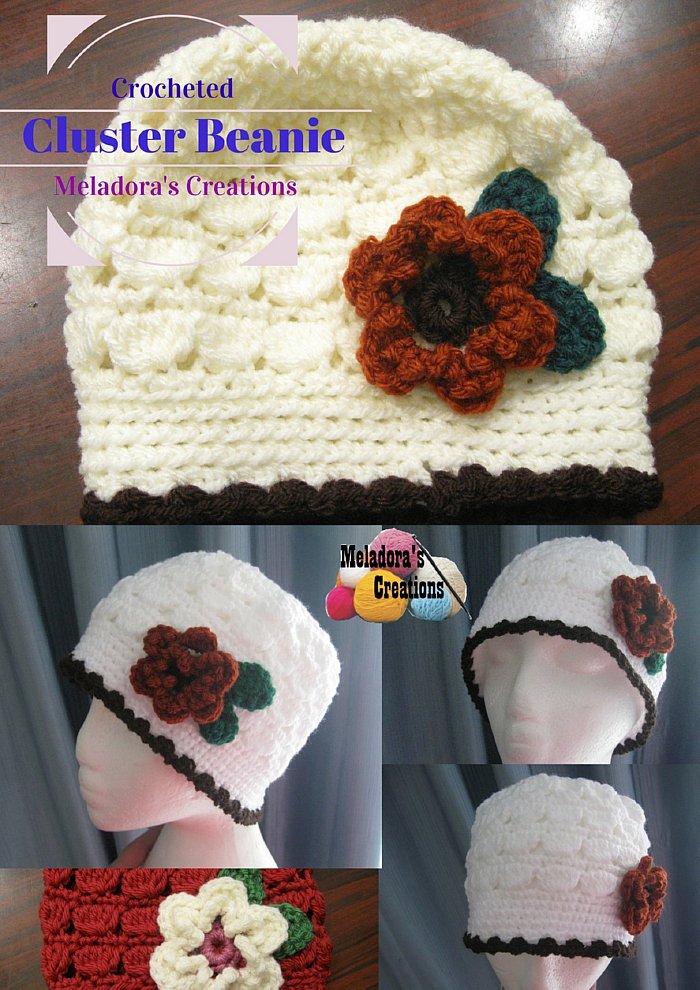
This Cluster Crochet Beanie Free Crochet pattern will teach you how to crochet a cluster stitch beanie for all sizes. This stitch is surprisingly warm! I used to set up a table to sell my wears at the mall, and I didn’t realize it was going to be so windy and cold on one of the mornings I was there. Lucky for me I was selling scarves, afghans, fingerless gloves and hats.
Needless to say I grabbed some stuff and put it on. One of the adult hats I was selling was a Cluster Beanie, it has holes in it so I was worried it wouldn’t be warm enough, but to my surprise it did the trick! I stayed toasty warm under all my crocheted gear.
Find more crochet stitches here on the category Crochet Stitches.
Or more Beanie patterns here Crochet Beanies
Be sure to sign up for my newsletter so you can always be update date with the free patterns I release as they come out! https://www.meladorascreations.com/sign-up-for-newsletter/
This stitch is also used in the Pattern & tutorials for:
Cluster Crochet Beanie – Free Crochet Pattern
This page contains affiliate links
For this project you will need:
HOOK: 5 mm hook or size H hook for the US
YARN: I used one skein worsted weight yarn, 4 ply US, 10 ply AU
100 grams / 3.5. oz
240 meters / 262 yards
a stitch marker of some kind
Another yarn brand with color options
ABBREVIATIONS
(click on link to find tutorials)
ch = Chain
sl st = Slip Stitch
st(s) = Stitch(es)
sk = Skip
YO = Yarn Over
sk a st = skip a stitch
beg = beginning
sc = Single Crochet
dc = Double Crochet
* = Repeat what is in between the stars for the rest of the row
For Beanie sizes
0-6 months – stop increasing after round 2
6-12 months stop increasing after round 2 and add one more row of clusters before starting the rim.
and for 0 – 12 months you will have 36 sts and 12 clusters
1-3 years stop increasing after round 4
for years 1-3 you should have 48 sts and 16 clusters
4 years old to adults – size follow the pattern from start to end
you should have 60 sts and 20 clusters
THE TUTORIALS:
RIGHT HANDED VERSION
LEFT HANDED VERSION
If you haven’t yet, take a moment to subscribe to my videos on YouTube to have easy access to all my videos and playlist @meladora1 on YouTube
![]()
PDF Pattern with Pictures
You can find the PDF version of my pattern with pictures on Ravlery Or my shop on Etsy.
Thank you very much for all you do to support my channel.
Be sure to come to my Facebook page to ask questions if you get stuck.
Remember to sign up for my email so you can always be update date with the free patterns I release as they come out! https://www.meladorascreations.com/sign-up-for-newsletter/

This stitch is done in multiples of 3
NOTE : The tutorial has been redone in HD and the pattern has been updated to match the new tutorial.
We will be working the invisible join method so you should always end with the increase.
To start:
ch 4 and sl st into beginning ch to form a loop.
Round 1
Ch 2 (counts as first dc) dc 11 into loop, sl st into the top of the beginning ch 2 (12 sts)
Round 2
ch 2 (this ch 2 will not could as a st and is only a step up and is to be ignored for the round) dc 2 into same st, dc 2 in all sts around, ignoring the ch2 and sl into beginning DC to end the round.
(24 sts)
Round 3 ( 0 – 12 months you are done increasing after this round)
ch 2 (this ch 2 will not could as a st and is only a step up and is to be ignored for the round) * dc 1 into the same beg stitch st, dc 2 in the next stitch st * repeat til end of round, sl st into beg DC st (36 sts)
Round 4 ( 1-3 years you are done increasing after this round)
ch 2 (this ch 2 will not could as a st and is only a step up and is to be ignored for the round) * dc 1 into the same beg stitch st, dc 1 in the next stitch, dc 2 in the next stitch st * repeat til end of round, sl st into beg DC st(48 sts)
Round 5
ch 2 (this ch 2 will not could as a st and is only a step up and is to be ignored for the round) * dc 1 into the same beg stitch st, dc 1 into the next 2 sts, dc 2 in the next stitch st * repeat til end of round, sl st into beg DC st (60 sts)
Round 6
(Special Stitch) The Cluster
ch 1 and pull up a loop, working into same stitch as ch 1, start to do a dc, but don’t finish the st, leaving the last loop on the hook. Repeat again into same stitch as shown below ( 3 loops on hook) I call this the Incomplete Double Crochet or IDC. It’s what you use to create clusters.
Repeat again in the next st ( 5 loops on hook)
Repeat again in next st ( 7 loops on hook)
The YO and pull through all 7 loops
Then ch 2. Repeat this until end of round. After the very last cluster of the round, there is no need to ch 2, just ch 1 and sl st in the beg st. The sl st counts as your second chain. (20 clusters)
Round 7
ch 1 and single crochet in same stitch. Single crochet in each stitch around. There are 3 stitches above each cluster as shown below, you will be single crocheting in each hole of the pretzel. Sl st into beginning st( 60 sts)
Rounds 8 – 13
You will be repeating Rounds 6 & 7 three more times.
NOTE : Remember if your making size 6-12 months, do one more row of clusters before starting the rim
MAKING THE RIM
If you are making this hat for a 4 – 10 year old, you may want to do some decreases on the rim and only make it 3 rounds instead of 5 for a better fit.
Round 13
Ch 1 and change colors for rim. Do your sc round as normal. (60 sts)
Rounds 14 – 16
ch 1 and sc into same st, single crochet in all sts working in back sts only
Round 17
To get the trim on the very rim of hat.
Ch 1 and sc into same st, ch 1, sc into same st, Sk a st, * sc, ch 1, sc into same stitch, sk a st * repeat til end of round, sl st into last stitch. Ch 1 cut tail, work in ends.
This pattern is brought to you by www.meladorascreations.com
You can sell any item made from this pattern and link back to my page or videos, but you do not have permission to copy and paste my pattern anywhere online. ©Copyright 2021, All Rights Reserved
~~~~~~~~~PLEASE READ BELOW!~~~~~~~~~~
If you’d like to see my channel stay and grow, please consider becoming a patron.
Or you could make a one time donation through PayPal. Thank you so much for your support! God Bless!
Comments are closed.