This Cable Pocket Shawl Crochet Pattern is crocheted width wise. So the rows are short and sweet.
Not so much to remember and the rows pass by quickly so this Pocket Shawl grows pretty quick!
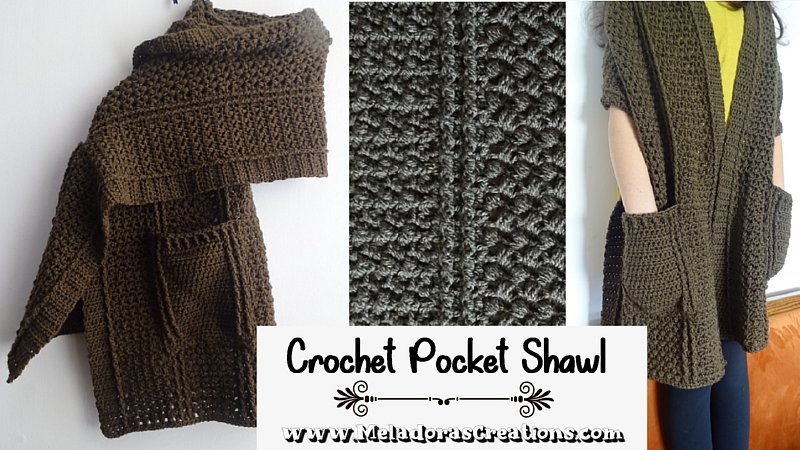
This crochet Pocket Shawl stitch pattern is easy to replicate and you’ll be watching your favorite TV show while you mindlessly crochet this beautiful Pocket Shawl in no time. This is more of a Crochet Pocket Wrap with because of it’s width, so you’ll be sure to have a warm back, shoulders and with those nice big deep pockets for your hands!
Find more patterns like this here on the category Scarves
Find more patterns like this here on the category Shawls
Cable Pocket Shawl – Crochet Shawl with Pockets Free Pattern
Please don’t forget to Pin this onto your favorite crochet boards!
This page contains affiliate links

For this project you will need:
- HOOK: 5 mm hook or size H hook for the US
- YARN: I used 5 skeins of worsted weight yarn, 4 ply US, 10 ply AU – 100 grams / 3.5. oz , 240 meters / 262 yards
- Tapestry Needle
- Stitch Markers (at least 3 to hold pocket down when sewing)
This Shawl Measures
40 cms or 16 inches in width & 169 cms or 66 Inches in length. But make it as long as you need.
Gauge
1 stich per 1 cm
ABBREVIATIONS
(click on link to find tutorials)
ch = Chain
sl st = Slip Stitch
st = Stitch
sk = Skip
beg = beginning
YO = Yarn Over
FPDC = Front Post Double Crochet
BPDC = Back Post Double Crochet
SC = Single Crochet
HDC = Half Double Crochet
SCFS = Single Crochet foundation stitch
Repeat what’s in between * for rest of round.
Special Stitches
Bean Stitch (click for tutorial) – In this pattern it’s know as BS
This stitch uses two stitches to compete
Insert your hook into the 3rd chain from the hook pull up a loop,
YO and insert hook into same stitch,
repeat 1 more time,
6 loops on hook,
YO and pull through all 6 loops, ch 1.
Butterfly Stitch(click for tutorial) – In this pattern it’s know as BFS
In second chain from hook pull up a loop,
ch 1 using the loop you just pulled up, now you should have 2 loops on your hook,
go into next stitch and pull up another loop,
now double crochet by pulling through 2 loops at a time, CH 1
PDF Pattern with Pictures
You can find the PDF version of my pattern with pictures on Ravlery Or my shop on Etsy. Thank you very much for all you do to support my channel.

Row 1
SCFS 54 ch 2 and turn
CH 55 , sc in 2nd ch from hook and in all 54 sts. Ch 2 and turn
Small note: The ch 2’s at the beginning of your rows won’t count as a stitch in this pattern.
Row 2
HDC in the first 7 sts.
Ch 1 and WITHOUT skipping a stitch, BFS five times (see special st), this will take a total of 10 stitches.
Don’t forget to do the ch 1 to end the BFS or else the stitch will turn into a decrease.
HDC in the next 5 sts.
CH 1 and skip a st,
then |BS, ch 1 and skip a stitch| repeat 4 more times for a total of 5 BS’s.
After the last BS you naturally ch 1 so just skip a st and HDC in next 5 sts.
We’re going to do the next set of BFS’s, remember that before you start to crochet your BFS’s that you first CH 1.
So after your 5 HDC’s you’ll ch 1
and WITHOUT skipping a st,
BFS five times, this will take a total of 10 stitches.
HDC in your last 7 sts. Ch 2 and turn.
Row 3
We’ll work our 7 HDC’s from last row as follows….
HDC in the first 5 HDC’s.
FPDC on the post of the next HDC.
HDC in the final HDC.
CH 1 and skipping the first big space…..
Now we’ll be using the wings of our BFS’s from now on when crocheting our BFS’s.
If you take a look at your project from the side and spread it apart you will see there are two little spaces that are separated only by a strand of yarn. This is what I am referring to as the “wings of the stitch”. Like before the BFS uses two stitches to create, these two “wing spaces” will be what we’ll be using to make our BFS’s from now on. You should have 5 of these spaces.
So create your 5 BFS’s as you did before using the wing spaces,
then HDC in the HDC,
then FPDC onto the post of the next HDC,
then HDC in the HDC,
then FPDC onto the post of the next HDC,
HDC in the last HDC. Ch 1.
Skip the BEAN part of the stitch, we’ll be putting our next BEAN st in the space beside them. Repeat 4 times until you have all 5 beans.
Then we’ll be crocheting our next HDC section like we did before.
HDC in the HDC,
then FPDC onto the post of the next HDC,
then HDC in the HDC,
then FPDC onto the post of the next HDC,
HDC in the last HDC. Ch 1.
Which brings you back up to the BFS section. Skip over to the first set of wings and using the wing spaces create your 5 BFS’s on this side of design.
We’ll work the last 7 HDC’s as follows….
HDC in first HDC,
FPDC on post of next HDC.
HDC in last 5 HDC’s. Ch 2 and turn.
In hopes NOT to confuse you, I will be calling the FPDC’s we did on the last row BPDC’s for this row. The reason for this is because our FPDC’s are now facing the other way now. So they are technically BPDC’s for this row.
Row 4
HDC in the first 5 HDC’s.
BPDC on the post of the next BPDC.
HDC in the final HDC.
CH 1 and skipping the first big space create your 5 BFS’s as you did before using the 5 the wing spaces.
Then HDC in the HDC,
then BPDC onto the post of the next BPDC,
then HDC in the HDC,
then BPDC onto the post of the next BPDC,
HDC in the last HDC. Ch 1.
Skip the BEAN part of the stitch, we’ll be putting our next BEAN st in the space beside them. Repeat 4 times until you have all 5 beans.
Then we’ll be crocheting our next HDC section like we did before.
HDC in the HDC,
then BPDC onto the post of the next BPDC,
then HDC in the HDC,
then BPDC onto the post of the next BPDC,
HDC in the last HDC. Ch 1.
Which brings you back up to the BFS section. Skip over to the first set of wings and using the wing spaces create your 5 BFS’s on this side.
HDC in first HDC,
BPDC on post of next BPDC.
HDC in last 5 HDC’s. Ch 2 and turn.
Row 5
HDC in the first 5 HDC’s.
FPDC on the post of the next FPDC.
HDC in the final HDC.
CH 1 and skipping the first big space create your 5 BFS’s as you did before using the wing spaces.
Then HDC in the HDC,
then FPDC onto the post of the next FPDC,
then HDC in the HDC,
then FPDC onto the post of the next FPDC,
HDC in the last HDC. Ch 1.
Skip the BEAN part of the stitch, we’ll be putting our next BEAN st in the space beside them. Repeat 4 times until you have all 5 beans.
Then we’ll be crocheting our next HDC section like we did before.
HDC in the HDC,
then FPDC onto the post of the next FPDC,
then HDC in the HDC,
then FPDC onto the post of the next FPDC,
HDC in the last HDC. Ch 1.
Which brings you back up to the BFS section. Skip over to the first set of wings and using the wing spaces create your 5 BFS’s on this side.
HDC in first HDC,
FPDC on post of next FPDC.
HDC in last 5 HDC’s. Ch 2 and turn.
Repeat Rows 4 and 5
After you crochet your scarf \ wrap through a few skeins it will be time to stop and create your pockets.
You really want to do this before you use up all your yarn. So do this a bit in advance if you are short on skeins of your color. Also keep in mind you will need to have enough yarn for the last row of Single crochets.

How to make the Pocket
Row 1
SCFS 21 or ch 22 and ch 1 and turn,
sc in second ch from hook. Sc in 21 sts.
Ch 2 and turn.
Row 2
HDC in all 21 sts. Ch 2 and turn
Row 3
HDC in 1st st. then FPDC on the post of the next HDC,
then HDC in the HDC,
then FPDC on the post of the next HDC,
HDC in the next 13 sts.
FPDC on the post of the next HDC,
then HDC in the HDC,
then FPDC on the post of the next HDC.
HDC in last st of row.
Row 4
HDC in 1st st. then BPDC on the post of the next BPDC,
then HDC in the HDC,
then BPDC on the post of the next BPDC,
HDC in the next 13 sts.
BPDC on the post of the next BPDC,
then HDC in the HDC,
then BPDC on the post of the next BPDC.
HDC in last st of row.
Repeat rows 3 and 4 until you have a total of 17 rows.

Row 18
Then you should have the Front Post’s side facing you.
Start the row as normal, HDC in 1st st.
then FPDC on the post of the next FPDC,
then HDC in the HDC,
then FPDC on the post of the next FPDC.
But now you’ll want to repeat this pattern.
HDC on next HDC,
then FPDC on the next FPDC.
Alternating between those 2 sts. You should end up perfectly aligned to the last 5 sts that you will crochet as normal.
HDC, FPDC, HDC, FPDC then HDC in last st.
Ch 2 and turn.
Row 19
HDC on next HDC,
then BPDC on the next BPDC.
Alternating between those 2 sts for the whole row.
HDC in last st. ch 1 and turn.
Row 20
LOOSELY slip stitch or sl st and ch 1, whichever is easier for you in all the stitches along the top.
CH 1 and cut yarn and set aside or continue and attach your pocket. SEE BELOW on Tips for Sewing on your pocket PLUS SEE BELOW for the last row of the SHAWL
TIPS ON ATTACHING YOUR POCKET
I used markers in all 4 corners of my pocket to hold it in place as I sewed.
I counted 13 rows up from the bottom and set the bottom of the pocket to start there, but feel free to put the pocket higher or lower on your shawl. Just where ever it feel comfortable for you. But I do recommend not sewing it so close to the bottom but at least 5 rows or more up from the bottom row.
Anyway, once you’ve picked your placement
Align the two bar lines on the pocket with the 2 bar lines on the scarf \ wrap. Using the st on the outside of the FPDC’s to sew on.
Go through both sts, one on the pocket and one on the wrap. I used sl st and ch 1 and slowly made my way all the way around the pocket.
If you create your other pocket in advance, you can just crochet your Shawl \ Wrap until you have enough yarn for a last row of single crochets and the yarn to sew on the pocket.
So by now you should have a two pocket’s made and one sewn on.
You’re running out of yarn and are ready to create your last row of single crochets.
FINISHING your SHAWL
Last ROW of Shawl
SC in the first 7 sts (7), this should bring you up to your first set of wings.
SC in each set of wings, this is a total of 10 sts (17)
then sc into the next 5 sts of the HDC’s\ FPDC section. (22)
SC using both sts of the BS this time, for a total of 10 sts (32)
then sc into the next 5 sts of the HDC’s\ FPDC section. (37)
SC in each set of wings, this is a total of 10 sts (47)
SC in the Last 7 sts (54) ch 1 and cut yarn leaving a long enough tail to be hidden with a tapestry needle.
Now use remaining yarn to sew on your last pocket.
Hide all your tails using a tapestry needle. ENJOY!
This pattern is brought to you by www.meladorascreations.com
You can sell any item made from this pattern and link back to my page or videos, but you do not have permission to copy and paste my pattern anywhere online. ©Copyright 2023, All Rights Reserved
PLEASE READ BELOW!
If you’d like to see my channel stay and grow, please consider becoming a patron.
Or you could make a one time donation through PayPal. Thank you so much for your support! God Bless!