
This Diamond Crochet Mesh Filet Afghan uses a method of crochet called filet stitch crochet. The thing about this crocheted diamond stitch filet pattern that’s SO awesome is that the spaces also make a diamond pattern too. Only it’s reversed, so it’s a diamond with a refection.
I have a sister in law that is expecting her first child! Maybe you remember her from one of my past projects she modeled for me. Hats, shawls and scarves. She’s helped my channel a lot in the past!
Anyway, I wanted to crochet a special baby blanket for her. When I first saw this stitch I knew it would be perfect! I loved how there were diamonds in the spaces as well as the solid diamonds. A shifting into something else, just like she is…. a Mother.
I do plan on having a piece of fleece sewn onto the back of this afghan before I give it as a gift to make it much warmer and leaving no holes for the babies fingers to get stuck in.
I really hope you like this afghan as much as I do and want to make one for someone you love too!
Find more crochet stitches here on the category Afghans & Baby Blankets
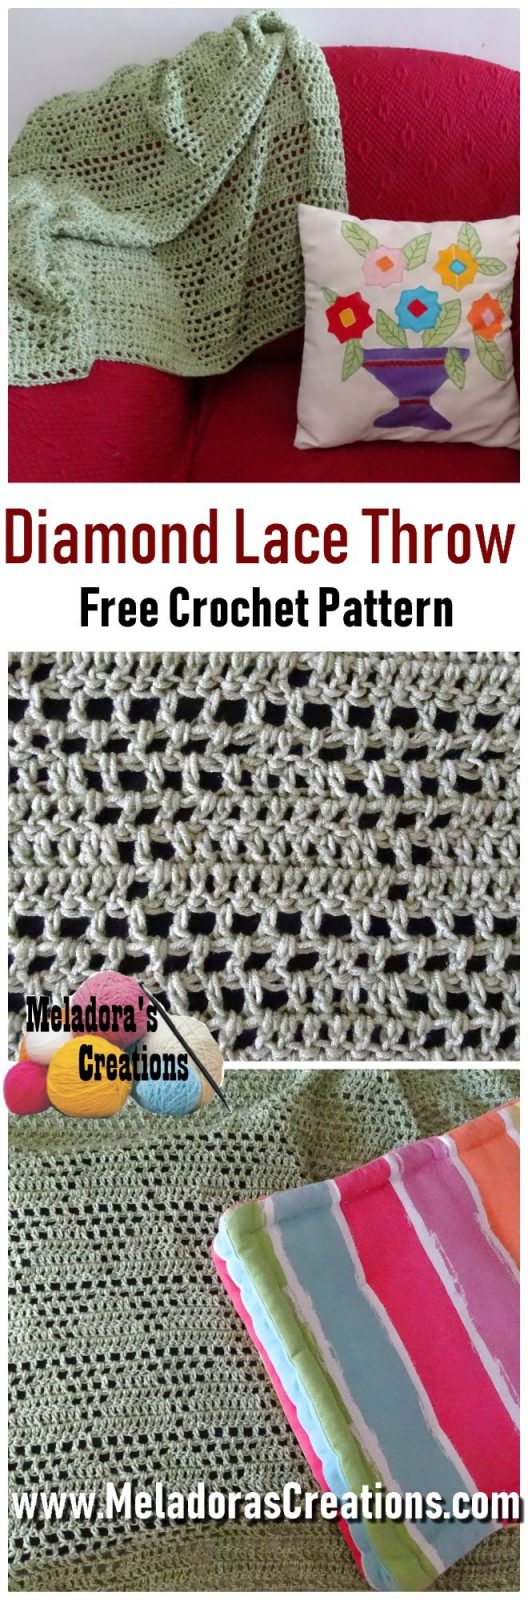
Diamond Lace Filet Throw – Free Crochet Pattern
Please don’t forget to Pin this onto your favorite crochet boards!
This page contains affiliate links
PDF Pattern with Pictures
You can find the PDF version of my pattern with pictures on Ravlery Or my shop on Etsy. Thank you very much for all you do to support my channel.
FaveCrafts has added this to there “25 Free Crochet Afghan Patterns: One Piece Only“ Collection. Go and see the full list for yourself. I hope it gives you more ideas!
For this project you’ll need:
- HOOK: 5 mm hook or size H hook for the US
- YARN: Worsted weight yarn, 4 ply US, 10 ply AU
I used four 100 gram skeins.
ABBREVIATIONS
(click on link to find tutorials)
ch = Chain
sl st = Slip Stitch
st = Stitch
sk = Skip
DC = Double Crochet
* = Repeat what is in between the stars for the rest of the row
THE VIDEO TUTORIALS:
All my Video Tutorials
If you haven’t yet, take a moment to subscribe to my videos on YouTube to have easy access to all my videos and playlist @meladora1 on YouTube
If you need a chart to follow along with this stitch, you can find one here.
CHART 84
To Start
Chain 126 or if you want a bigger size, chain in multiples of 12 until you reach your desired width then chain 6 more and you’re ready to begin row 1.
Row 1
dc into 5th ch from hook. * Ch 1. Skip 1 dc in next stitch. * Repeat for row. Dc in last stitch. ch 4 and turn
Row 2
Now skipping the first 2 DC’s and using the next ch 1 space, DC and ch 1. Repeat and DC and ch 1 in next ch 1 space. – Now we’re going to start making the bottom of our first diamond – * DC in the next ch 1 space but don’t ch 1 this time. DC into the next DC, DC into the next ch 1 space and ch 1. – DC and CH 1 in the next 4 ch 1 spaces. * repeat for row.
To end row: dc and ch 1 in your last 2 ch 1 spaces and in the ending ch 3. ch 3 and turn
Row 3
dc in 1st ch 1 space and ch 1, DC and ch 1 in the next ch 1 space as well. *Dc in the next ch 1 space, DC into the next 3 DC’s , DC into the next ch 1 space and CH 1. Dc and ch 1 into the next 3 ch 1 spaces*
repeat for row. To end row: after your last 5 dc’s in a row, you’ll ch 1 and dc in the next ch 1 space, the DC twice in ending ch 4 space. ch 4 and turn
Row 4
Dc and ch 1 in 1st ch 1 space. * Dc in the next ch 1 space, DC into the next 5 DC’s, DC into the next ch 1 space and ch 1. DC and ch 1 in the next 4 ch 1 spaces, CH 1. DC and ch 1 in the next 2 ch 1 spaces.* repeat for row.
To end row: after your last 7 dc’s in a row, ch 1 and DC into the next ch 1 space, then ch 1 and dc in ending ch 3. ch 3 and turn.
Row 5
Dc and ch 1 in 1st ch 1 space. *Dc in the next ch 1 space, DC into the next 7 DC’s , DC into the next ch 1 space and ch 1. Dc and ch 1 into the next 3 ch 1 spaces, CH 1. DC and ch 1 in the next ch 1 space* repeat for row.
To end row: after your last 9 dc’s in a row, ch 1 and DC into the next ch 1 space, Ch 1 and DC twice in ending ch 4 space. ch 4 and turn
Row 6
Dc in 1st ch 1 space, * DC into the next 9 DC’s, DC into the next ch 1 space and ch 1. Dc and ch 1 in next ch 1 space* repeat for row. To end row: after your last 11 dc’s in a row. ch 1 and dc in top of ch 3 space. ch 3 and turn
Row 7
Dc and ch 1 in 1st ch 1 space, *skip 1 DC and DC ch 1 in next* repeat for row. To end row DC twice in ending ch 4 space. ch 3 and turn
Row 8
The ch 3 counts as the 1st dc of the row, dc in next stitch (2nd dc of row) then dc into the ch 1 space. *CH 1 and DC into the next 5 ch 1 spaces. DC into the next DC, DC in next ch 1 space * repeat for row.
To end row: after your last dc in your very last ch 1 space, dc in the last dc and dc in the top of the ch 3. Then ch 3 and turn
Row 9
The ch 3 counts as the 1st dc of the row, DC in next 2 dc’s and *DC in the next ch 1 space. ch 1 & DC in the next 4 ch 1 spaces, DC in the next 3 DC’s, then DC ch 1 into the next 4 ch 1 spaces.* repeat for row.
To end row: after your last dc in your very last ch 1 space, dc in the last 2 dc’s and dc in the top of the ch 3. Then ch 3 and turn
Row 10
The ch 3 counts as the 1st dc of the row, DC in next 3 dc’s and *DC in the next ch 1 space. ch 1 & DC in the next 3 ch 1 spaces, DC in the next 5 DC’s, then DC ch 1 into the next 3 ch 1 spaces.* repeat for row.
To end row: after your last dc in your very last ch 1 space, dc in the last 3 dc’s and dc in the top of the ch 3. Then ch 3 and turn
Row 11
The ch 3 counts as the 1st dc of the row, DC in next 4 dc’s and *DC in the next ch 1 space. ch 1 & DC in the next 2 ch 1 spaces, DC in the next 7 DC’s, then DC ch 1 into the next 2 ch 1 spaces.* repeat for row.
To end row: after your last dc in your very last ch 1 space, dc in the last 4 dc’s and dc in the top of the ch 3. Then ch 3 and turn
Row 12
The ch 3 counts as the 1st dc of the row, DC in next 5 dc’s and *DC in the next ch 1 space. ch 1 & DC in the next ch 1 space, DC in the next 9 DC’s, then DC ch 1 into the next ch 1 space.* repeat for row.
To end row: after your last dc in your very last ch 1 space, dc in the last 5 dc’s and dc in the top of the ch 3. Then ch 3 and turn
Row 13
Dc and ch 1 in 1st ch 1 space, *skip 1 DC and DC ch 1 in next* repeat for row. To end row DC twice in ending ch 4 space. ch 3 and turn
repeat rows 2 – 13
This pattern is brought to you by www.meladorascreations.com
You can sell any item made from this pattern and link back to my page or videos, but you do not have permission to copy and paste my pattern anywhere online. ©Copyright 2024, All Rights Reserved
PLEASE READ BELOW!
If you’d like to see my channel stay and grow, please consider becoming a patron.
Or you could make a one time donation through PayPal. Thank you so much for your support! God Bless!