
The color options for the Dimension Crochet Beanie are endless and would be a great way to match your winter gear. The video tutorials take you through step by step through the stitch to make it easy for you to make this awesome looking beanie.
Find more Beanie patterns here Crochet Beanies
Another pattern that uses this stitch is: Dimension Stitch (done in rows)
Dimension Crochet Beanie – Free Crochet Pattern and Video Tutorials
Please don’t forget to Pin this onto your favorite crochet boards!
This page contains affiliate links

For this project you’ll need:
- HOOK: 5 mm hook or size H hook for the US
- YARN: 1 skein of worsted weight yarn, 4 ply US, 10 ply AU
ABBREVIATIONS
(click on link to find tutorials)
ch = Chain
sl st = Slip Stitch
st = Stitch
sk a st = Skip a stitch
beg = beginning
SC = Single Crochet
DC = Double Crochet
BPDC = Back Post Double Crochet
* = Repeat what’s in between * for rest of round.
PDF Pattern with Pictures
You can find the PDF version of my pattern with pictures on Ravlery or Etsy. Thank you very much for all you do to support my channel.
THE VIDEO TUTORIALS:
All my Video Tutorials
If you haven’t yet, take a moment to subscribe to my videos on YouTube to have easy access to all my videos and playlist @meladora1 on YouTube
So now to answer the question, how many rows you need to do?
Since this hat is done in so many rows and colors that are all blended together it makes counting each row very hard! Trust me! So lets go by measurement. Get out your tape measures and let me show you how to measure to get the size you need.
- Baby – 3 to 6 months
Hat height= 6.5 – 7″ \ cms 16.5 – 17.7 - Baby – 6 to 12 months
Hat height = 7.5″ \ cms 19 - Toddler – 12 months – 3 years
Hat height = 8″ \ cms 20 - Child – 3 – 10 years
Hat height = 8.5″ \ cms 21.5 - Teens, Adult Woman and Adult Man
Hat height 9 – 10″ \ cms 22.8 – 25.4
How to measure your hat: Lay your hat flat, make sure your first row at the top of the hat is in half, this will ensure your hat is folded perfectly in half.
Then measure from the first round at the top, to the last round you crocheted. The number you are looking for is 1 inch or 2.52 cms less that total number desired. To leave room to make the rim.
- If you are making a Baby – 3 to 6 months, you would stop crocheting the dimension stitch once your hat measured 5.5” or 14 cms. Then start your rim.
- If you are making a Baby – 6 to 12 months, you would stop crocheting the dimension stitch once your hat measured 6.5” or 16.51 cms. Then start your rim.
- If you are making a Toddler – 1 – 3 years, you would stop crocheting the dimension stitch once your hat measured 7” or 17.78 cms. Then start your rim.
- If you are making a Child – 3 – 10 years, you would stop crocheting the dimension stitch once your hat measured 7.5” or 18.98 cms. Then start your rim.
- If you are making a Teens, Adult Woman and Adult Man, you would stop crocheting the dimension stitch once your hat measured 8.5” or 22 cms. Then start your rim.
The Start / Crown of the hat
**This stitch is done in multiples of 2**
Once you have the size needed then move onto the stitch portion of the pattern.
I used 3 colors for my hat. You can use as many as you want, but pick a main color that you wish to use for the top of and rim of the hat. I have found that the darkest of the colors works best.
To Start
ch 3, sl st in beginning ch to form a ring.
Round 1
Ch 2 and work 11 dc’s in 3rd chain from hook, sl st in beg ch 2 to end round. The ch 2 counts as a stitch (for every round) so you should have (12 sts total.)
Round 2
ch 2 and dc into same stitch, dc 2 in all sts, sl st into beg ch 2 (24 sts)
Round 3
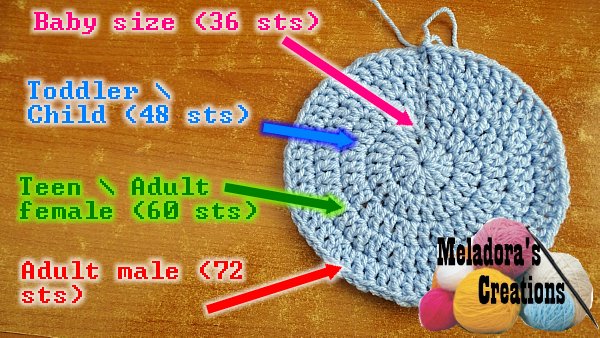
ch 2, dc 2 in next stitch * dc 1, dc 2 * repeat for round, sl st into beg ch 2 (36 sts)
stop increasing for Baby size
Round 4
ch 2, dc 1 in next stitch * dc 2, dc 1, dc 1 * repeat for round, sl st into beg ch 2 (48 sts) stop increasing for Toddler \ Child size
Round 5
ch 2, dc 1 in next 2 sts, * dc 2, dc 1, dc 1, dc 1 * repeat for round, sl st into beg ch 2 (60 sts) Teen \ Adult female
Round 6
ch 2, dc 1 in next 3 sts, * dc 2, dc 1, dc 1, dc 1, dc 1 * repeat for round, sl st into beg ch 2 (72 sts) Adult Male
Dimension Stitch Portion of Hat
I will be making my hat in 3 colors. You will be switching colors EVERY row, but DO NOT cut your yarn. You will be dropping it and picking it back up later as you need it.
Since you were using your main color to make the top of your hat, now it’s time to change to your second color.
Row 1 (change to 2nd color)
ch 3, sk a st * dc in next st, ch 1, sk a st * repeat for round. No need to ch 1 after the last dc of round, just sl st in the top ch of beginning ch 2.
Row 2 (change to 3rd color)
ch 1 and sc into ch, * dc into skipped st 1 row down, sc in dc * repeat for round. Sl st in the 2nd ch of beginning sc.
Row 3 (change to 1st color)
ch 1 and fpdc onto ch two rows down, * sc into dc, fpdc onto dc 2 rows down * repeat for round, Sl st in the beg fpdc to end round.
Row 4 (change to 2nd color)
ch 1 and sc into fpdc, * fpdc 2 rows down on the fpdc from round 2, sc into next fpdc * repeat for round. Sl st in the beg sc to end round.
Row 5 (change to 3rd color)
ch 1 and fpdc onto ch two rows down, * sc into dc, fpdc onto dc 2 rows down * repeat for round, Sl st in the beg fpdc to end round.
Row 6 (change to 2nd color)
ch 1 and sc into fpdc, * fpdc 2 rows down on the fpdc from round 2, sc into next fpdc * repeat for round. Sl st in the beg sc to end round.
Repeat rows 3 – 6 until desired length is reached.
The Rim
Once your hat measures it’s correct size, make that you end your hat when you have switched back to the color you used for the top of the hat. Do another row if you need in order to accomplish that.
Using original color
Rounds 1 – 5
Put 1 single crochet in each stitch around. You should have the same amount of stitches that you had before starting your Dimension stitch.
So if you stopped increasing after round 4 because you are making a Toddler \ Child size which left you with 48 sts, you should have 48 stitches every row for the rim.
Crochet 5 rounds or if you wish to do more if you want to get to the full correct size (see below the sizing) of the full length the finished hat should be.
- Baby – 3 to 6 months
Hat height= 6.5 – 7″ \ cms 16.5 – 17.7 - Baby – 6 to 12 months
Hat height = 7.5″ \ cms 19 - Toddler – 12 months – 3 years
Hat height = 8″ \ cms 20 - Child – 3 – 10 years
Hat height = 8.5″ \ cms 21.5
This pattern is brought to you by www.meladorascreations.com
You can sell any item made from this pattern and link back to my page or videos, but you do not have permission to copy and paste my pattern anywhere online. ©Copyright 2023, All Rights Reserved
PLEASE READ BELOW!
If you’d like to see my channel stay and grow, please consider becoming a patron.
Or you could make a one time donation through PayPal. Thank you so much for your support! God Bless!