
This video will guide you through the steps needed to crotchet an easy pullover crochet sweater for boys. From beginning to end, these step-by-step instructions and helpful tips will ensure a perfect outcome. With this video, you’ll be able to create a cozy and unique sweater for your boy in no time!
Find more crochet stitches here on the category Crochet for Children
Find more crochet stitches here on the category Crochet Sweaters
Other Patterns that use this stitch:
Easy Pullover Crochet Sweater for boys – Grit Stitch Sweater – Free Crochet Pattern
Please don’t forget to Pin this onto your favorite crochet boards!
This page contains affiliate links

For this Grit Stitch Sweater Project you will need:
- HOOKS: 5 mm hook or size H hook for the US and a 6 mm hook or J hook
- YARN: 3 skein of yarn, 4 ply US, 10 ply AU – 100 grams / 3.5. oz – 250 meters / 273 yards
- Tapestry needle, and 2 stitch markers
This stitch is done in Multiples of 2
This is child size. It fit my 4 year old as well as my 6 year old.
ABBREVIATIONS
(click on link to find tutorials)
ch = Chain
sl st = Slip Stitch
st = Stitch
sk = Skip
beg = beginning
SC = Single Crochet
DC = Double Crochet
HDC = Half Double Crochet
Repeat what’s in between * for rest of round.
THE VIDEO TUTORIALS:
RIGHT HANDED VERSION
LEFT HANDED VERSION
All my Video Tutorials
If you haven’t yet, take a moment to subscribe to my videos on YouTube to have easy access to all my videos and playlist @meladora1 on YouTube
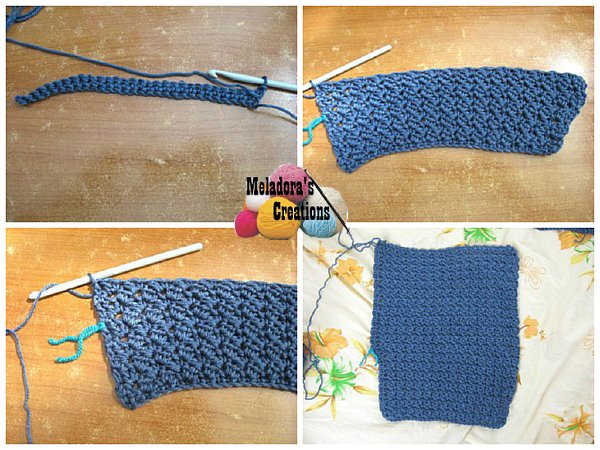
BACK OF SWEATER
To Start – USE THE 5 mm / H hook
Ch 42 – ( switch your hook size now )
Row 1 – Change to 6 mm / J hook
sc in all sts. Ch 1 and turn (41
Row 2
hdc in first stitch and * sk a st, sc and dc into next stitch. * repeat. Hdc in final stitch of row. Ch 1 and turn. (41)


Row 3
hdc in first stitch, skip the first stitch, which is the DC and work a * sc and dc into following sc, skip next stitch * repeat. HDC in final stitch. (41)
Rows 4 – 46
Repeat row 3 until you have 46 rows total. Then on the 46th row, ch 1 and cut yarn, leave enough of a tail to be worked in with a tapestry needle.

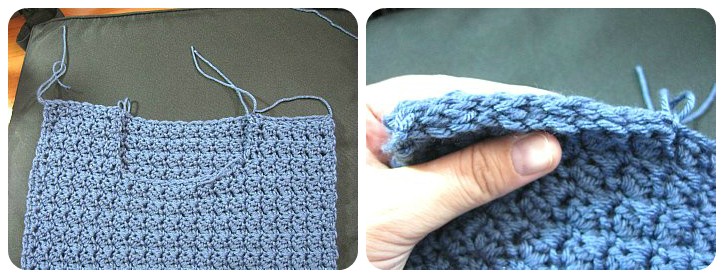
FRONT OF SWEATER
Rows are done the same way as back of sweater, only difference is you stop at row 36 and mark your stitches. 14 stitches from each corner leaving 12 stitches in the middle section for the neck.

Row 37
Then connect your yarn and crochet a HDC in the first stitch and * skip next stitch, sc and dc into next stitch * repeat until marker. HDC into marker space. Remove marker. Ch 1
Rows 38 – 42
HDC in the first stitch and * skip next stitch, sc and dc into next stitch * repeat HDC into marker space. Remove marker. Ch 1
SLEEVES – MAKE TWO
To Start – USING 5 mm / H hook
ch 31
Row 1 – CHANGE TO 6 mm / J hook
sc in 2nd ch from hook and in all sts (30)
Row 2
hdc in first stitch and * sk a st, sc and dc into next stitch. * repeat. Hdc in final stitch of row. Ch 1 and turn. (30)
Rows 3 – 5
hdc in first stitch, skip the first stitch, which is the DC and work a * sc and dc into following sc, skip next stitch * repeat. HDC in final stitch. (30)
Row 6
hdc TWO in first stitch, skip the first stitch, which is the DC and work a * sc and dc into following sc, skip next stitch * repeat. HDC in final stitch. (31)
Row 7
hdc in first stitch, skip the first stitch, which is the DC and work a * sc and dc into following sc, skip next stitch * repeat.
The last 2 HDC’s of the roware worked as follows:
sc and dc into first HDC then HDC in final HDC. Place a marker here to mark row 7 to help you see where you last increases encase you need to sit down your project. (32)
Rows 8 – 12
hdc in first stitch, skip the first stitch, which is the DC and work a * sc and dc into following sc, skip next stitch * repeat. HDC in final stitch. (32)
Row 13
hdc TWO in first stitch, skip the first stitch, which is the DC and work a * sc and dc into following sc, skip next stitch * repeat. HDC in final stitch. (33)
Row 14
hdc in first stitch, skip the first stitch, which is the DC and work a * sc and dc into following sc, skip next stitch * repeat.
The last 2 HDC’s of row are worked as follows:
sc and dc into first HDC then HDC in final HDC. Place a marker here to mark row 7 to help you see where you last increases encase you need to sit down your project. (34)
Rows 15 – 38
hdc in first stitch, skip the first stitch, which is the DC and work a * sc and dc into following sc, skip next stitch * repeat. HDC in final stitch. (34)
after round 38, ch 1 and cut yarn leaving a tail long enough to be worked in with a tapestry needle.
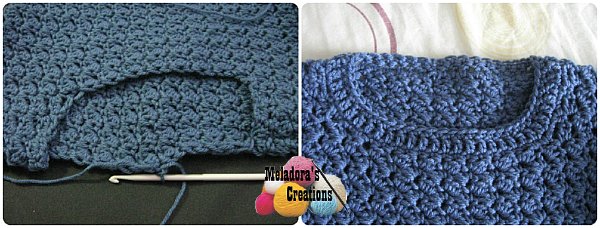
SEWING YOUR PIECES TOGETHER
Take your Back and Front pieces and put them together Right side facing. You can tell which is the right side by looking at the first row of single crochets.
Line the corners up and use a marker to hold them in place so you can slip stitch the 14 stitches that you already have marked. Going through one stitch on the front and it’s equal on the back of the sweater. When done with these 14 stitches Ch 1 and cut yarn.
Move over to your next set of 14 marked stitches and repeat.
Grab your arms now and fold the arm in half the long way, making sure the right side is on the inside. Attach your yarn on the thicker part of the arm and Slip stitch sew it closed. Take your time and use markers to help you keep your arm aligned as you slip stitch down the side. Ch 1 and cut your yarn.
Making sure both your body piece and arm piece is facing on the wrong side. Make sure the stitches of the arm is pointing down. And using your markers, attach the top shoulder and the arm together, and the bottom of the arm to the piece as well. You are only doing one side of the arm here. Look at the pictures below to get the idea I mean.
Attach your yarn at the marker under the arm and make your way to your other marker at the shoulder. Now remove the markers and place one at the bottom of the sleeve under the arm again. Now sew this part of the arm to the other body piece. To complete the circle. Then continue slip stitching down the sweater to close it. Repeat for other arm as well.

MAKING THE NECK
Round 1
Attach your yarn to the back of the neck. Sc in first stitch and in all stitches around. Sl st in beg stitch. Ch 2
Round 2
dc in all stitches around. Sl st into beginning st. ch 1
Round 3
sc into all stitches around, cut yarn, leave a tail to be worked in.
Work in all your tails.
This pattern is brought to you by www.meladorascreations.com
You can sell any item made from this pattern and link back to my page or videos, but you do not have permission to copy and paste my pattern anywhere online. ©Copyright 2023, All Rights Reserved
PLEASE READ BELOW!
If you’d like to see my channel stay and grow, please consider becoming a patron.
Or you could make a one time donation through PayPal. Thank you so much for your support! God Bless!