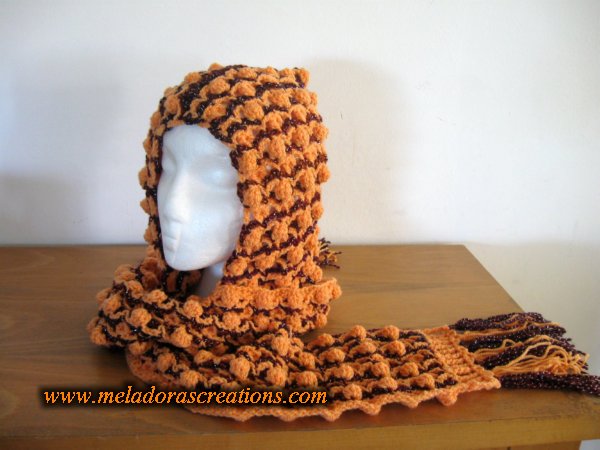
I just Love the look of this Crochet Scoodie! This crochet stitch is so cool! It needs two colors to get the effect right, a light one and a darker one. You can make anything using this stitch because I share the multiples with the stitch with you! So make a full blanket / afghan if you desire. This is a textured stitch but it is a mesh so keep this in mind. It would make a great piece for spring or fall.
You can find all my scarf patterns under the category SCARVES
Find all my Crochet Round up’s on the category Here
Other patterns that use this stitch are:
Shadow Stitch Scoodie – Free Crochet pattern, pictorial and video tutorial
Please don’t forget to Pin this onto your favorite crochet boards!
This page contains affiliate links

For this project you will need:
- HOOK: 5 mm hook or size H hook for the US
- Orange Yarn I used was: YARN: 2 skeins of worsted weight yarn, 4 ply US, 10 ply AU – 100 grams / 3.5. oz – 230 meters / 251 yards
- Purple yarn I used was: YARN: 1 skein of worsted weight yarn, 4 ply US, 10 ply AU – 100 grams / 3.5. oz – 230 meters / 251 yards
You will also need 3 stitch markers.
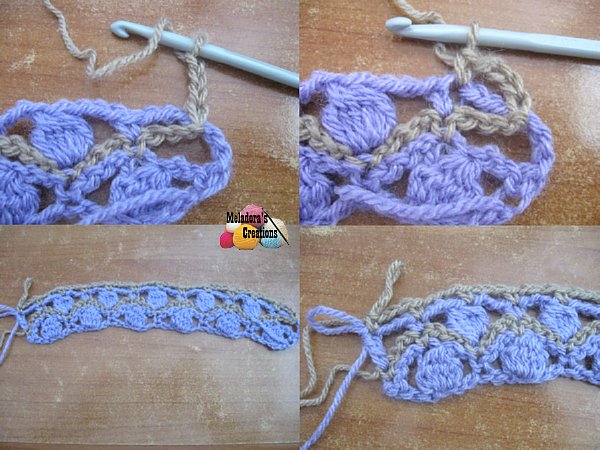
For this stitch you are using 2 colors. The 2nd color traces the first row like a shadow hence the name Shadow Tracery.
You will need two different color yarns.
- A = Main Color
- B = Secondary Color
In this project you will be working on the Right and Wrong side, make sure before each row you are working with the correct color and side mentioned. Don’t cut your yarn at the end of a row but drop it and pick it back up later.
ABBREVIATIONS
(click on link to find tutorials)
ch = Chain
SC = Single Crochet
DC = Double Crochet
Quad = Quadruple Crochet
sk # sts = Skip that number of stitches
hdc5tog = Half double crochet 5 stitches together
PC = Popcorn Cluster – You do this by hdc5tog all into the same stitch.
* = Repeat what’s in between * for rest of row
THE VIDEO TUTORIALS:
All my Video Tutorials
If you haven’t yet, take a moment to subscribe to my videos on YouTube to have easy access to all my videos and playlist @meladora1 on YouTube
PDF Pattern with Pictures
You can buy the ad free PDF version of my pattern with pictures on Ravelry or Etsy to support this channel. Either way thank you for being here and for all you do to support my channel.
The Multiples of the stitch
This stitch is done in multiples of 6 + 2
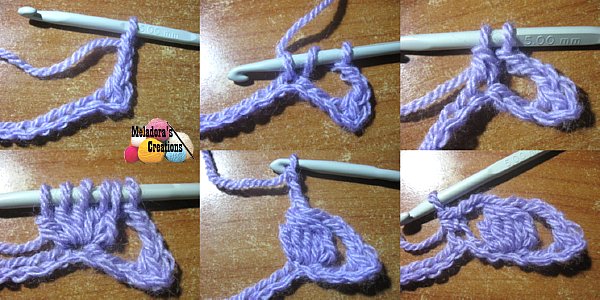
To Start (In A color)
Ch 20 or Ch in sets of 6 until you reach desired length then ch 2.
Row 1 (Right Side in A color)
sc in 2nd ch from the hook. *ch 3, sk 2 sts, Pc into next ch, ch 3, sk 2 sts, sc into next stitch. * repeat until end then DO NOT turn.
Row 2 (Right Side in B color)
Join yarn into first stitch by doing a single crochet attachment. Don’t know how? Use this helpful video https://www.youtube.com/watch?v=VZhft3QLj-c * ch 3, sk 3 sts, sc into next PC, ch 3, sk 2 sts, sc into next sc. Repeat at end you will sc into last sc of row. Do not cut yarn. TURN.
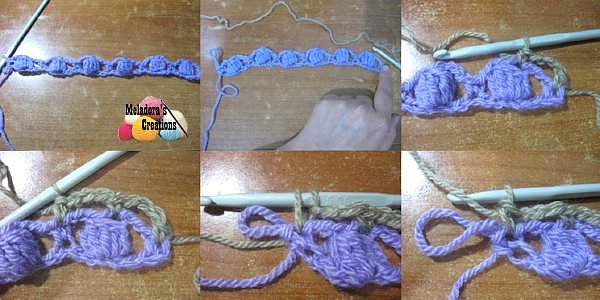
Row 3 (Wrong side in A color)
ch 6 (this will count as your beginning dc and ch 3) skip the first ch 3 and sc and sc into next sc * ch 3, sk 3 sts, PC into next sc, ch 3, sk 3 sts, ch into next sc * Repeat for row. Dc into last stitch. DO NOT turn.
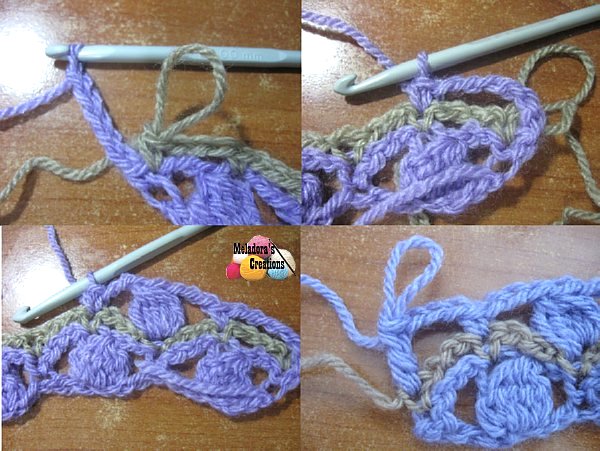
Row 4 (Wrong side in B color)
Pick up yarn and sc into 3rd ch. * ch 3, sk 3 sts, sc into next sc, ch 3, sk 3 sts, sc into next sc * Repeat for row. Turn.
Row 5 (Right Side in A color)
ch 1 and sc into 1st stitch. * ch 3, sk 3 sts, PC into next sc, ch 3 sk 3 sts, sc into next sc * repeat for row. DO NOT turn.

Row 6
Pick up yarn and sc into 3rd ch. * ch 3, sk 3 sts, sc into next sc, ch 3, sk 3 sts, sc into next sc * Repeat for row. Turn.
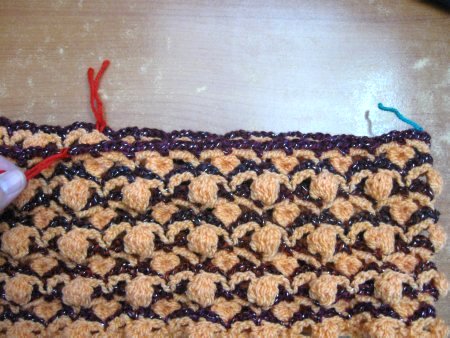
You will be repeating rows 3 – 6 until you reach your 17th row or your desired width. After 16th row you can cut your MC and after 17th row you can cut your secondary color.
MAKING THE HOOD
Fold your scarf in half and find the closest as you can to the middle stitch and place a stitch marker here.

Then count over 12 ch 3 sections from this middle marker and place a another marker here. Repeat for the other side. You can remove middle stitch marker now.
Attach your yarn in the sc before the marker. Pay close attention to what stitch should be here, if normally you would be a PC in this stitch, then attach your yarn like you going to do a double crochet attachment, but don’t go through last 2 sts or for a beginner, you can sl st your color on and ch 2 and work your other 4 sts of the PC and continue as normal.
You will work the rows as normal, just like you did the scarf.
I did 26 rows. 1 row of PC and 1 row of sc’s and ch’s as you did before. You should be ending as always on a sc and ch row.

Cut your yarn on your main color on row 25, but keep your secondary color attached after row 26 because you will use it to sew the hood closed.
After you get your 26 rows done then you’re ready to sew the top of your hood closed.

Fold your hood in half, and the top of the fold is where you will single crochet your hood closed. Start by going into the last two stitches and work your way to the tip of the hood, cut yarn and hide tails.


END OF SCARF
Row 1 (In A color)
Attach your color by slip stitching and ch 5. Work a Quad (Quadruple Crochet) in the next stitch. Depending on how wide you made your scarf, amount of stitches may vary, but on my scarf I tried to do a Quad on the end of each row. I skipped a few end stitches so that my quad’s wouldn’t be to close together. I got 14 quads on each side. Ch 1 and turn
Row 2 (In A color)
sc in each stitch. (14 sts)

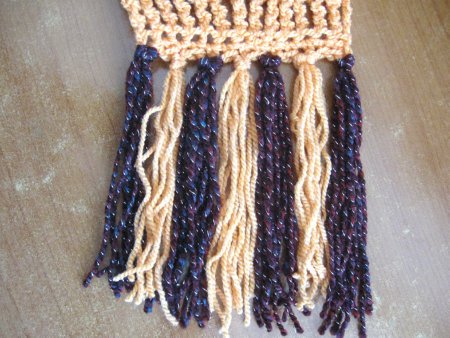
FRINGE
To make the fringe you will have to grab a cd case or something you can wrap your yarn around so you can make an even fringe. I wrapped mine around 10 times and split the 10 strings down to 5 and used 5 on each side of the scarf. I alternated between colors.
This pattern is brought to you by www.meladorascreations.com
You can sell any item made from this pattern and link back to my page or videos, but you do not have permission to copy and paste my pattern anywhere online. ©Copyright 2024, All Rights Reserved
PLEASE READ BELOW!
If you’d like to see my channel stay and grow, please consider becoming a patron.
Or you could make a one time donation through PayPal. Thank you so much for your support! God Bless!