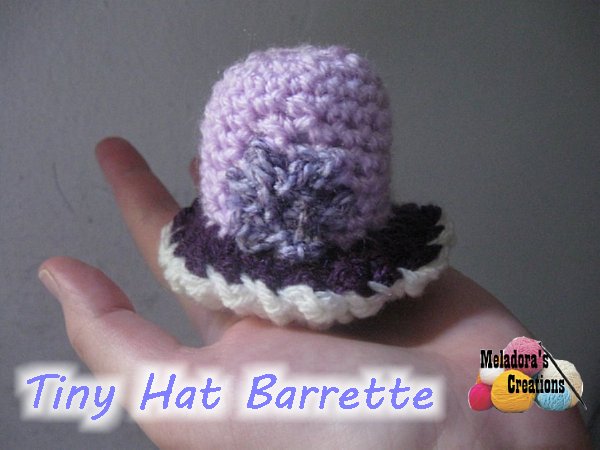
Crochet pattern and tutorial that teaches you how to make Crochet barrette hair clips. This Crochet a Tiny Hat Barrette I made for my daughter. It’s super easy to make! All you need is a bit of scrap yarn, some stuffing, and a metal barrette clip.
You can find more things like this under the category Hair Accessories

For this project you will need:
- HOOK: 4 mm / US size 6
- YARN: 2 different color skeins of worsted weight yarn, 4 ply US, 10 ply AU – 100 grams / 3.5. oz – 210 meters / 230 yards
- A bit of fiber fill for stuffing the hat
- Some kind of marker to mark your rounds.
- Tapestry Needle to hide your tails
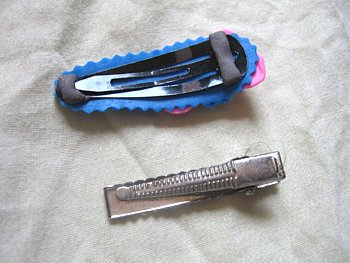
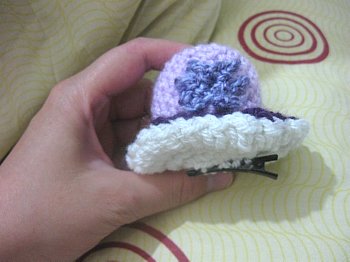
- A small clip barrette, either of the kind in the picture below works nicely.
ABBREVIATIONS
(click on link to find tutorials)
ch = Chain
sl st = Slip Stitch
st = Stitch
SC = Single Crochet
DC = Double Crochet
THE VIDEO TUTORIALS:
RIGHT HANDED VERSION ONLY
All my Video Tutorials
If you haven’t yet, take a moment to subscribe to my videos on YouTube to have easy access to all my videos and playlist @meladora1 on YouTube
PDF Pattern with Pictures
You can buy the ad free PDF version of my pattern with pictures on Ravelry or Etsy to support this channel. Either way thank you for being here and for all you do to support my channel.
Making the top of the hat
Round 1
ch 4 and sl st into beginning chain to form a ring. Sc 10 into ring. (10)
Round 2
sc 2 into first stitch and using your marker, mark this beginning st. Continue to sc 2 in each st around. (20)
Round 3
sc into each st around (20)
Round 4
sc 7, then do a dec, sc 7, then do a dec, sc last two sts (18)
Round 5
sc 6, then do a dec, sc 6 then do a dec, sc last 2 sts (16)
Rounds 6 – 10
sc 1 in all sts around (16)
Round 11
Dc 3 into all sts around (48) ch 1 cut yarn

Making the Bottom
Round 1
ch 4, sl st into beginning st to form a ring, ch 1 and sc 10 into ring (10)
Round 2
sc 2 into all sts (20)
Round 3
sc 2 in first st, sc 1 in next (sc 2, sc1) repeat to end (30)
Round 4
sl st into next st and ch 2 (this counts as first dc) dc into same st.
dc 1 into next st, dc 2 into next st (dc 1, dc 2) repeat til end of round (45) ch 1 and leave yourself a LONG tail, because you will be using this tail to sew the bottom to the top and to sew your metal clip barrette to your hat.

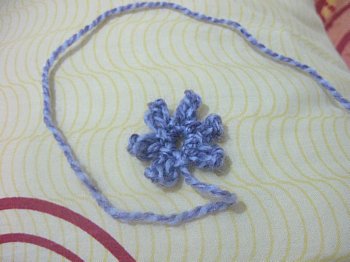
Making the Flower
change to your 3.5 mm hook, US E
Round 1
ch 3, sl st to beginning st to form a ring.
Round 2
ch 3, sc in 2nd ch from hook, sl st into last ch, then sl st into ring, ch 3 and repeat 4 or 5 more times or as many petals as you like.
Putting it all together
First sew your flower onto your hat. Then stuff your hat.

Then sew the bottom part to the hat using the whip stitch, skipping 2 sts in between, and pulling snug, this will give you a ruffle look to your edge.

Now with the flower facing you, line up your needle to be in the center left and grab your metal barrette. Like picture shows below.
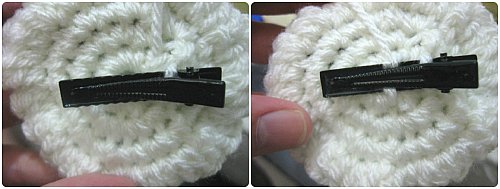
Making sure that the barrette opens to the left, sew your barrette on by first going between the barrette, then into your hat.
After doing this a few times you can wrap your yarn around your barrette a few times before continuing to sew through middle and the hat again.
Make it snug against hat and your done!
TIP: Helps the hat not to droop if you sew the brim together in the middle somewhere next to the barrette, just work a X pattern to make it snug.
This pattern is brought to you by www.meladorascreations.com
You can sell any item made from this pattern and link back to my page or videos, but you do not have permission to copy and paste my pattern anywhere online. ©Copyright 2025, All Rights Reserved
PLEASE READ BELOW!
If you’d like to see my channel stay and grow, please consider becoming a patron.
Or you could make a one time donation through PayPal. Thank you so much for your support! God Bless!