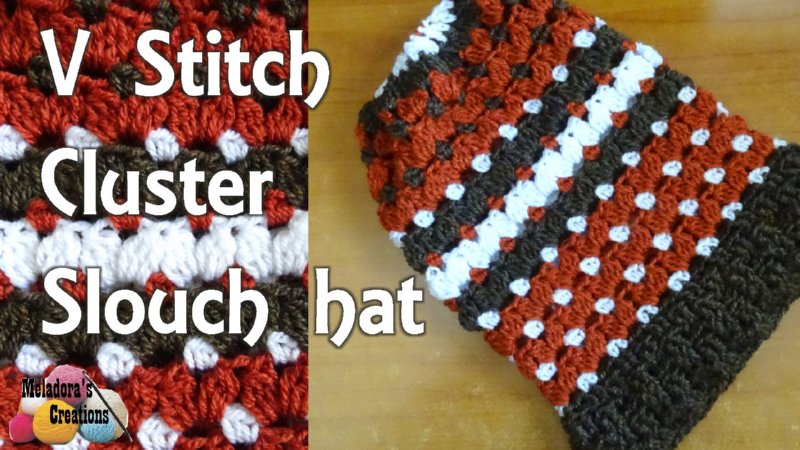
This V stitch Cluster Crochet Slouch Hat is so easy to make and you have the choice how long to make it. Crochet a beanie or a slouch hat! The way the colors blend together gives you lots of options as well.
My daughter has grown up so much since I first used her as a model, we’ve really had fun. Thank you all for your continued encouragement and a special thanks to you Patrons who support my channel every month the way you do! This crocheted slouch hat would look awesome with a pom pom on top, it would had weight and make the slouch hat more slouchy!
Find more crochet stitches here on the category Crochet Hats
V stitch Cluster Slouch Hat – Free Crochet Pattern and Tutorial
Please don’t forget to Pin this onto your favorite crochet boards!
This page contains affiliate links

- HOOK: 5 mm hook or size H hook for the US
- YARN: 2 skeins of worsted weight yarn, 4 ply US, 10 ply AU
100 grams / 3.5. oz
240 meters / 262 yards
The Yarn I used in the pattern is from Kartopu. They no longer have this in stock.
ABBREVIATIONS
(click on link to find tutorials)
ch = Chain
sl st = Slip Stitch
st = Stitch
sk = Skip
SC = Single Crochet
DC = Double Crochet
FPDC = Front Post Double Crochet
BPDC = Back Post Double Crochet
DC dec = Double Crochet decrease
* = Repeat what’s in between * for rest of round.
THE VIDEO TUTORIALS:
All my Video Tutorials
If you haven’t yet, take a moment to subscribe to my videos on YouTube to have easy access to all my videos and playlist @meladora1 on YouTube

PDF Pattern with Pictures
You can find the PDF version of my pattern with pictures on Ravlery. Thank you very much for all you do to support my channel.

Making the rim of the Hat
To Start:
Ch 64 or a number divisible by 8. Use this multiple to make any size hat you need. Just don’t forget to reduce the total length of the hat as well as you reduce the size. Sl st in beginning ch to create a loop.
Round 1
Sl st into beginning ch and ch 1 and DC in the st you just sl sitiched into, DC in all sts around. Make sure you count your sts and have 64 or the number you started with. sl st in beginning st (not the ch)
Round 2
ch 1 and BPDC into first post, BPDC on post of next stitch as well. * FPDC on next 2 sts, BPDC on next 2 sts * repeat for row. sl st in 1st BPDC (64 sts)
Rounds 3 & 4
ch 1 and FPDC into first post, FPDC on post of next stitch as well. * BPDC on next 2 sts, FPDC on next 2 sts * repeat for row. sl st in 1st FPDC (64 sts)
Round 5
ch 1 and BPDC into first post, BPDC on post of next stitch as well. * FPDC on next 2 sts, BPDC on next 2 sts * repeat for row. sl st in 1st BPDC (64 sts)
Now we start on the stitch portion on the hat
Round 6
sc in first 2 sts, * ch 2, skip 2, sc in next 2 sts. * sl st in beg sc (64 sts)
NOTE: If you want to add color like I did in this hat, then you want to change colors every SC row, and then switch to a different color on the DC cluster row.

Round 7
ch 3 and dc cluster using 3 incomplete dc’s, pull through all three loops and ch 2, repeat dc cluster. repeat for round. sl st in beg cluster. (64 sts)
Round 8
ch 1 and sc in 2 chs, ch 2, sc in next ch 2 space. at the end only ch 1 then sl st in ch 1 space. sl st in sc.(64 sts)
Repeats rounds 7 & 8 until your hat measures 10 inches or 25 centimeters from Rim to last row crocheted.

Time to Reduce!
Round 1
Ch 2 and create a DC cluster in ch 2 space, this time instead of chaining 2 like you normally would, instead go into the next space and do a DC cluster there. Do a DC sluster in every space between clusters and in the ch 2 spaces.
Then repeat for the row. DO NOT chain in between clusters. sl st in beg cluster
Round 2
ch 2 and DC DEC . To end row: sl st into beginning ch 2 space.
Round 3
ch 1 and sc in every stitch around. sl st in beginning sc.
Now chain 1 and leaving a long tail, enough to sew up your hat, cut your yarn.
Turn your hat inside out and thread your tapestry needle with your long tail. Weave through the stitches making a draw string to pull hole closed. Tie some knots. Hide tail.
This pattern is brought to you by www.meladorascreations.com
You can sell any item made from this pattern and link back to my page or videos, but you do not have permission to copy and paste my pattern anywhere online. ©Copyright 2023, All Rights Reserved
PLEASE READ BELOW!
If you’d like to see my channel stay and grow, please consider becoming a patron.
Or you could make a one time donation through PayPal. Thank you so much for your support! God Bless!
Or you could make a one time donation through PayPal. Thank you so much for your support! God Bless!