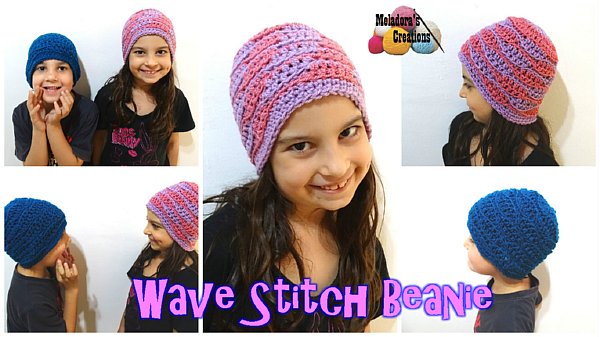
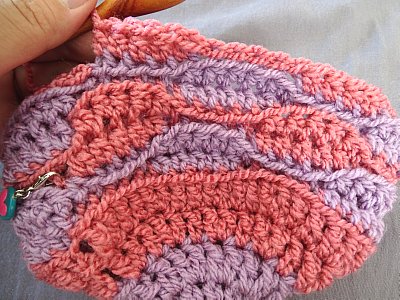
This Wave Stitch Crochet Beanie Free Crochet pattern teaches how to make fun beanie great for all sizes! Waves beanie adds a very nice texture for the eye and if done with 2 colors it can really be amazing looking!
Find more Beanie patterns here Crochet Beanies
Other patterns that use this stitch are:
Wave Stitch Beanie – Free Crochet Pattern and Video tutorial
Please don’t forget to Pin this onto your favorite crochet boards!
This page contains affiliate links

For this project you’ll need:
- HOOK: 5 mm hook or size H hook for the US
- YARN: 1 skein of worsted weight yarn, 4 ply US, 10 ply AU / 100 grams / 3.5. oz -240 meters / 262 yards
- And a Stitch Marker
Sizes from baby to adult.
Increase until you have…..
- Baby – 36 sts – 3 months to a year
- Toddler \ Child – 48 sts – 2 to 10ish years
- Teen \ Adult – 60 sts
Sizing continued….Once you have your increase number for your size, you will need to even out your number to a solid number. This is because the stitch are in sets of 10. So the following row after you have done increasing, you will have to add a few more increases along the next row as you go. Baby size will need 40 sts total, Toddler \ Child size will need 50 total. The adult size is a solid even number so no more increases will be necessary.
ABBREVIATIONS
(click on link to find tutorials)
ch = Chain
sl st = Slip Stitch
SC = Single Crochet
DC = Double Crochet
HDC = Half Double Crochet
( ) = repeat this part for # of times mentioned
* = repeat what is in between for rest of row
THE VIDEO TUTORIALS:
All my Video Tutorials
If you haven’t yet, take a moment to subscribe to my videos on YouTube to have easy access to all my videos and playlist @meladora1 on YouTube
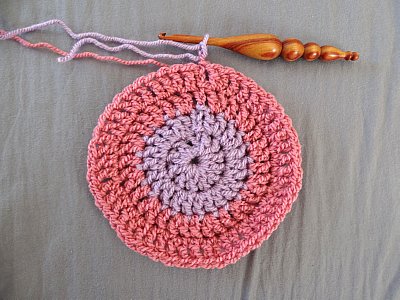
To Start
Ch 3 and sl st into beginning ch to form a ring.
Round 1
Ch 2 and DC 11 into center of ring. Sl st in top of beginning ch 2 to end the round. (12 sts)
Round 2
Ch 2 & DC into same stitch. DC 2 into all sts around. sl st in top of beginning ch 2 to end the round. (24 sts)
Round 3
Ch 2, * DC 2 into next st, DC into next st * sl st in top of beginning ch 2 to end the round. (36 sts) BABY SIZE you are done increasing. Move down to WAVE STITCH ROUND
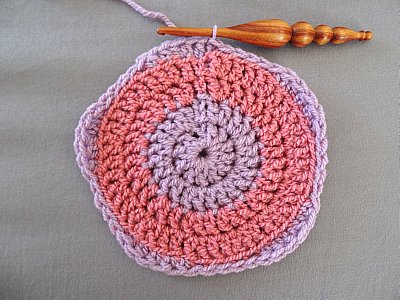
Round 4
Ch 2, DC into the next st, DC 2 into next st * DC 1 into next two sts, DC 2 into next st * sl st in top of beginning ch 2 to end the round. (48 sts) TODDLER \ CHILD SIZE you are done increasing. Move down to WAVE STITCH ROUND
Round 5
Ch 2, DC into the next 2 sts, DC 2 into next st * DC 1 into next three sts, DC 2 into next st * sl st in top of beginning ch 2 to end the round. (60 sts)
NOTE FOR ADULT SIZE… If you find your hat is to small for an adult you can always do one more row of increases, but to make sure you stay a solid number, stop increasing during the row once you reach 70 sts.
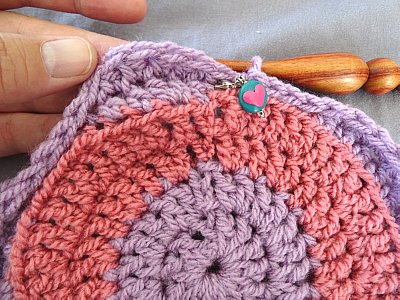
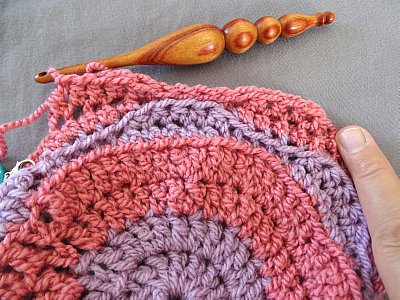
WAVE STITCH ROUND
BABY SIZE
Round 1 ( USING BACK LOOPS ONLY )
MARK BEGINNING ST
Ch 1, HDC in same st, 2 HDC’s in next st, HDC in next two sts, sl st in next 5 sts * HDC in next st, 2 HDC’s in next st, HDC in next two sts, sl st in next 5 sts * This should give you 40 sts at the end of your round. This hat is worked in continuous rounds so make sure you mark that beginning st.
Round 2 ( USING FRONT LOOPS ONLY )
* HDC in next 5 sts, sl st in next 5 sts. *
Round 3 ( USING BACK LOOPS ONLY )
* Sl st in next 5 sts, HDC in next 5 sts *
Round 4 ( USING FRONT LOOPS ONLY )
* Sl st in next 5 sts, HDC in next 5 sts *
Rounds 5 – 12
Repeat rounds 1 – 4 until you have 12 rounds total. Then you are ready to make the rim of the hat.

TODDLER \ CHILD SIZE
Round 1 ( USING BACK LOOPS ONLY )
MARK BEGINNING ST
Ch 1, HDC in same st, 2 HDC’s in next st, HDC in next two sts, sl st in next 5 sts ( HDC in next st, 2 HDC’s in next st, HDC in next two sts, sl st in next 5 sts ) This should give you 50 sts total.
Once you have 50 sts, finish the row like this * HDC in next 5 sts, sl st in next 5 sts. * This hat is worked in continuous rounds so make sure you mark that beginning st.
Round 2 ( USING FRONT LOOPS ONLY )
* HDC in next 5 sts, sl st in next 5 sts. *
Round 3 ( USING BACK LOOPS ONLY )
* Sl st in next 5 sts, HDC in next 5 sts *
Round 4 ( USING FRONT LOOPS ONLY )
* Sl st in next 5 sts, HDC in next 5 sts *
Rounds 5 – 14
Repeat rounds 1 – 4 until you have 14 rounds total. Then you are ready to make the rim of the hat.
TEEN \ ADULT SIZE
Round 1 ( USING BACK LOOPS ONLY )
MARK BEGINNING ST
HDC in same st and in next 4 sts, sl st in next 5 sts. * HDC in next 5 sts, sl st in next 5 sts. * repeat for round. This hat is worked in continuous rounds so make sure you mark that beginning st
Round 2 ( USING FRONT LOOPS ONLY )
* HDC in next 5 sts, sl st in next 5 sts. *
Round 3 ( USING BACK LOOPS ONLY )
* Sl st in next 5 sts, HDC in next 5 sts *
Round 4 ( USING FRONT LOOPS ONLY )
* Sl st in next 5 sts, HDC in next 5 sts *
Rounds 5 – 14
Repeat rounds 1 – 4 until you have 14 rounds total. Then you are ready to make the rim of the hat.

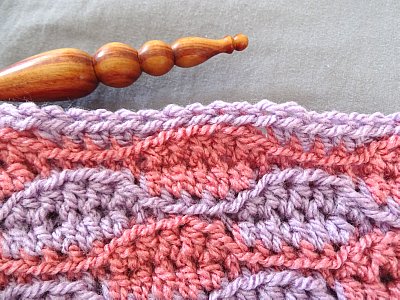
RIM OF THE HAT
Round 1 ( BACK LOOPS ONLY )
* sc in next 5 sts, sl st in next 5 sts *
Round 2 & 3 (working under BOTH loops )
sc in all sts around
This pattern is brought to you by www.meladorascreations.com
You can sell any item made from this pattern and link back to my page or videos, but you do not have permission to copy and paste my pattern anywhere online. ©Copyright 2024, All Rights Reserved
PLEASE READ BELOW!
If you’d like to see my channel stay and grow, please consider becoming a patron.
Or you could make a one time donation through PayPal. Thank you so much for your support! God Bless!