
This Birds of a Feather Beanie is part of a crochet series that all use the Birds of a Feather Stitch. This crochet tutorial and pattern will teach you how to make this crochet beanie in all sizes. So why not make one for the whole family in their favorite color!
For more Beanie patterns click here Crochet Beanies
Other patterns that use this stitch are:
- Birds of a Feather Slouch Hat
- Birds of a Feather Scarf
- Birds of a Feather Fingerless Gloves
- Birds of a Feather Crochet Cowl
Birds of a Feather Beanie – All Sizes – Free Crochet Pattern
Please don’t forget to Pin this onto your favorite crochet boards!
This page contains affiliate links

For this project you will need:
- HOOK: 5 mm hook or size H hook for the US
- YARN: two colors skeins of worsted weight yarn, 4 ply US, 10 ply AU – 100 grams / 3.5. oz – 210 meters / 230 yards
- Tapestry Needle
ABBREVIATIONS
(click on link to find tutorials)
ch = Chain
sl st = Slip Stitch
st = Stitch
sk = Skip
dec = decrease
beg = beginning
YO = Yarn Over
sc = Single Crochet
dc = Double Crochet
Sc dec =single crochet decrease
Repeat what’s in between * for rest of round.
IMPORTANT NOTE: There is no need to cut your yarn as you change colors ever round. Just drop one color and replace it with the other color. Do not carry the yarn with you, just let it hang there waiting for you when you reach the beginning of your round again.
MC = Main Color
SeC = Secondary Color
THE VIDEO TUTORIALS:
All my Video Tutorials
If you haven’t yet, take a moment to subscribe to my videos on YouTube to have easy access to all my videos and playlist @meladora1 on YouTube
PDF Pattern with Pictures
You can find the PDF version of my pattern with pictures on Ravlery Thank you very much for all you do to support my channel.
To Start: – with MC
ch 3 and sl st into beginning ch to form a ring.
Round 1 – with MC
ch 2 and dc 11 into ring, sl st into top of ch 2 to end round (12 sts)
Round 2 – with MC
ch 2 and dc into same stitch, dc 2 in all sts around, sl st into top of ch 2 to end round (24 sts)
Round 3 – with MC
ch 2 and dc into same stitch, *dc 1 into next stitch, dc 2 into next stitch* repeat. sl st into top of ch 2 to end round (36sts) Stop increasing here and continue below if you are making a newborn size hat. 0-3 months
Round 4 – with MC
ch 2 and dc into same stitch, *dc 1 into next 2 stitches, dc 2 into next stitch* repeat. sl st into top of ch 2 to end round (48sts) Stop increasing here and continue below if you are making a baby hat size hat. 4 to 10 months
Round 5 – with MC
ch 2 and dc into same stitch, *dc 1 into next 3 stitches, dc 2 into next stitch* repeat. sl st into top of ch 2 to end round (60 sts) toddler to adult female stop increasing here.
For a man with a bigger head
Round 6
ch 2 and dc into same stitch, *dc 1 into next 4 stitches, dc 2 into next stitch* repeat. sl st into top of ch 2 to end round (72 sts)
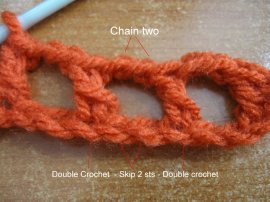
BIRDS OF A FEATHER STITCH
Once you are done increasing to your desired size
You have two options on how to color your hat. I am showing you how to color it in this pattern like shown above, with lightest color being the birds. But there is another option. If you like, you can begin the next row with the MC and have this look as shown in the hat below, making the MC the color of the birds. It’s up to you.
Round 1 – with SeC
ch 1 and dc into same stitch. Ch 2 and sk 2 sts, *dc into next stitch, ch 2 and sk 2 sts * Repeat. sl st into beginning st.
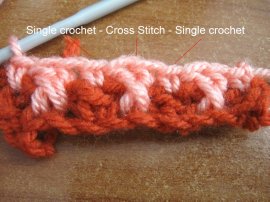
Round 2 – With MC
sc into beginning st you just sl stitched into. *Then CS by skipping a st and dcing into the next stitch. Then dc into the st you just skipped to complete the CS. Sc into next stitch* Repeat. sl st into beginning st. With rounds 2 and 3 now completed you now have your first set done. Set = when 1st and 2nd rows are completed.
First set
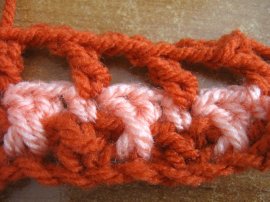
Start of second set
You will repeat rounds 1 and 2 of hat to complete a set. Depending on the size hat your making, you will have less sets before starting your rim. See sizing below.
- Newborn size – 3 sets before starting rim
- Baby – 4 sets before starting rim
- Toddler – 4 sets before starting rim
- Child / Adult woman – 6 sets before starting rim
- Man with large head – 6 sets before starting rim
Once you have your correct amount of sets done, you’re ready to start the rim.
Depending on the size of hat your making, you will have a different amount of rows for each size.
- Rim For Newborn
Rounds 1 – 3 (3 ROUNDS)
sc in all sts around. Sl st into next st and ch 1, cut yarn. Hide tail
- Rim for Baby
Rounds 1 – 4 (4 ROUNDS)
sc in all sts around. Sl st into next st and ch 1, cut yarn. Hide tail
- Rim for Toddler
Rounds 1 – 3
sc in all sts around.
Round 4
sc 5, sc dec 1, repeat 3 more times bringing your st count to 56 sts then sc in rest of sts around. (56 sts)
Round 5
sc in all sts around. Sl st into next st and ch 1, cut yarn. Hide tail
- Rim for Child / Adult female and same for Men
Rounds 1 – 5
sc in all sts around. Sl st into next st and ch 1, cut yarn. Hide tail
Feel free if the rim is to loose to decrease a few stitches on rim.
This pattern is brought to you by www.meladorascreations.com
You can sell any item made from this pattern and link back to my page or videos, but you do not have permission to copy and paste my pattern anywhere online. ©Copyright 2023, All Rights Reserved
PLEASE READ BELOW!
If you’d like to see my channel stay and grow, please consider becoming a patron.
Or you could make a one time donation through PayPal. Thank you so much for your support! God Bless!