
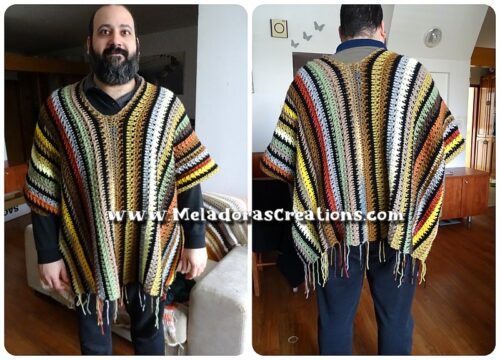
This Crochet Serape Poncho I crocheted for my husband after the first poncho I made was a bit to small for him. My son ended up wanted it so it’s his now. I made it from my Reverb Granny square and you can find that pattern over “Reverb Granny Square Poncho”.
Hubby made it clear he didn’t want me to use granny squares to make his. He’s not a fan of the granny square look.
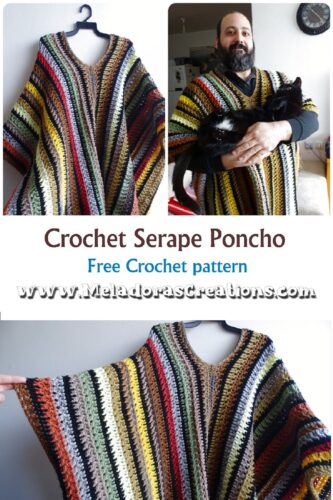
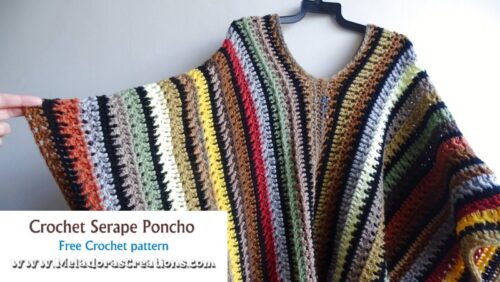
So I decided for this one I would go for a Serape style Poncho and I would use up a bit of scrap yarn to boot!
I tried to use more neutral Pastel colors, surrounded with black and when I showed him the test piece I made, he really liked it.
I used my Jagged Scrap Yarn Afghan design, replacing the white I used in the afghan for black. I made 2 pieces and sewed them in the middle, leaving a hole for the head of course!
He really likes it and wears it almost daily since it’s gotten cold. Finally a success! I hope you can make one you like as much as he likes his and get rid of some scrap yarn at the same time.
Find more Poncho’s here on my site on the category Ponchos
See my other Serape Crochet Poncho – Navajo Style that I made for my daughter
Crochet Serape Poncho – Free Crochet Pattern
Please don’t forget to Pin this onto your favorite crochet boards!
This page contains affiliate links
For this project you’ll need:
- HOOK: 6 mm hook or size J hook for the US
- YARN: I used worsted weight yarn, 4 ply US, 10 ply AU
Size
I used scrap yarn so it’s hard to say how much you need in all. But I would get two skeins of black and one skein of each of your other colors as long as your using at least 4 other colors it would be enough for a large size like this one.
His poncho measured 28 in/ 72 cms long from shoulder to bottom
and 40 in /102 cms wide.
It was created using two long panels that were sewn in two places, leaving a hole for the head.
ABBREVIATIONS
(click on link to find tutorials)
ch = Chain
sl st = Slip Stitch
st = Stitch
beg = beginning
YO = Yarn over
DCFS = Double Crochet Foundation stitch
FPDC = Front Post Double Crochet
DC = Double Crochet
Repeat what’s in between * for rest of round.
Special Stitch – Jagged Crochet Stitch
This stitch requires a prep row of DC’s
*YO and grab the post of the next DC, (If it’s the beginning of the row, you will grab the second post of the row)
YO and only pull through 2 sts leaving your last loop on the hook.
then moving over to the next DC, WITHOUT a YO,
insert your hook into the next DC and pull up a loop,
YO and pull through 2, YO and pull through 2 just like a
normal DC at that point.
Then Chain One – This is very important! *
Also be sure not to make your ch 1 spaces to tight because you will be crocheting into them later!
THE VIDEO TUTORIALS:
All my Video Tutorials
If you haven’t yet, take a moment to subscribe to my videos on YouTube to have easy access to all my videos and playlist @meladora1 on YouTube
How I colored my poncho:
I used 2 colors before switching to Black. The only exception was the first Jagged set of Jagged stitches and the last set of Jagged stitches of my panel.
I call them sets because to creating the Jagged Stitch takes two rows. The prep row then then Jagged stitch row.
How to make the panel (make two)
To start with your first color (prep row)
DCFS 180 or multiples of 2
Or if you’d prefer chaining then:
chain 181 then DC in 3rd ch from hook, DC in all chains (180 sts)
Row 1 – With same color (Jagged stitch row)
Our first stitch will be our Special Stitch – Jagged Crochet Stitch
Another tip before you get started. You will always start your Jagged Crochet stitch row by grabbing the second DC post of the row. You will grab it up as though you are making a FPDC.
Never use the 1st DC of the row to make your 1st Jagged crochet stitch of your row.
*YO and grab the post of the next DC, (If it’s the beginning of the row, you will grab the second post of the row)
YO and only pull through 2 sts leaving your last loop on the hook.
then moving over to the next DC, WITHOUT a YO,
insert your hook into the next DC and pull up a loop,
YO and pull through 2, YO and pull through 2 just like a
normal DC at that point.
Then Chain One – This is very important! *
IMPORTANT TIP
Be sure to skip the DC post you used for the second part of your Jagged Stitch. Remember this stitch takes TWO stitches to complete. You’ll always be using every other DC post on your row.
Repeat this for the whole row.
DC in top of ending ch 2. (90 Jagged Crochet Stitches)
Ch 2 and turn
Row 2 – Now it’s time to do a row in BLACK
To change colors I left the last two loops on my ending DC on my hook and finished the DC. Then I chained two with my new color.
The ch 2 counts as your first stitch.
This is how you’ll crochet your DC’s after a row of Jagged sts
First you come up to the ch 1 space of the stitch (remember the Jagged crochet stitch uses 2 sts)
*grab up the FLO of the 1st ch 1 st and DC ,
then DC in the next st as normal, go under both loops.*
repeat this for the entire row. (180 sts)
CH 2 and turn.
Row 3- Now pick a new Color – Prep Row
The ch 2 counts as your first stitch.
DC in all your DC’s. (180 sts)
Row 4 – Continue with the same color for the Jagged st row
So with your Prep row of DC’s finished you can start your Jagged crochet stitches for the row.
*YO and grab the post of the next DC, (If it’s the beginning of the row, you will grab the second post of the row)
YO and only pull through 2 sts leaving your last loop on the hook.
then moving over to the next DC, WITHOUT a YO,
insert your hook into the next DC and pull up a loop,
YO and pull through 2, YO and pull through 2 just like a
normal DC at that point.
Then Chain One.
*Repeat this for the whole row.
DC in top of ending ch 2. (90 Jagged Crochet Stitches)
TIPS
Be sure to count your stitches every so often to stay consistent.
You will know you’re off a stitch if the first part of your Jagged crochet stitch is not done on a DC that was done using both loops of the stitch Last row.
In other words, remember the DC you put in the FLO of your stitch?
Well take a look and you’ll see it sticks back a bit and the DC’s that you crocheted in BOTH loops of the DC from last row are more full and even stick out a bit more. This is the stitch I am referring to when I say the first part of your Jagged crochet stitch should begin on one of those stitches that stick out.
Repeat Rows 3 and 4, picking a new color to do these 2 rows.
Then it’s time to repeat for 2 again.
You will continue to repeat in this way. 2 different Jagged stitch rows, then one black row of DC’s for 22 rows. Then For rows 23 and 24 you’ll be repeating rows 3 and 4 to allow yourself to end on a row of color. For a total of 24 rows.
I am counting the FULL rows of jagged stitches, in other words to make it easier I am counting the prep and the jagged row stitches as one row. This makes it so much easier to get a final count!
So you should have a total of 8 DC’s rows in black and 16 rows of colors for your panel.
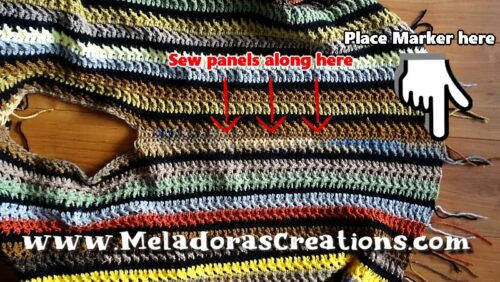
Once both panels are finished lay them side by side on a flat surface so that they lay evenly without draping. I used the floor when I did this.
Use a marker at one of the bottoms. Go through both panels, this hold the pieces together so you can sew them easier. Do the same for the other side as well. Then fold your piece in half to mark the neck piece.
I would a 12 in / 31 cms hole for the head. Place markers there so you don’t sew in your head hole space.
My husband also wanted arm holes so I sewed the sides up a bit, but I wouldn’t recommend doing it. But if you want to, leave roughly a 6 inch hole for each arm then sew up from the bottom just like you did for the panel attachments.
This pattern is brought to you by www.meladorascreations.com
You can sell any item made from this pattern and link back to my page or videos, but you do not have permission to copy and paste my pattern anywhere online. ©Copyright 2024, All Rights Reserved
PLEASE READ BELOW!
If you’d like to see my channel stay and grow, please consider becoming a patron.
Or you could make a one time donation through PayPal. Thank you so much for your support! God Bless!