I love a good crochet bookmarker, especially if its a flower one! It adds more of a relaxing vibe to have a flower to mess with while you’re reading, or to lay it into your book before you set it down and walk away.
As you can see by the list of crochet bookmarkers below, that I’ve been making several designs. I hope you’ll try out a few. they are great scrap busters and make great gifts for the book readers in your life.
You can find more things like this under the category For the Home
Other Book marker patterns:
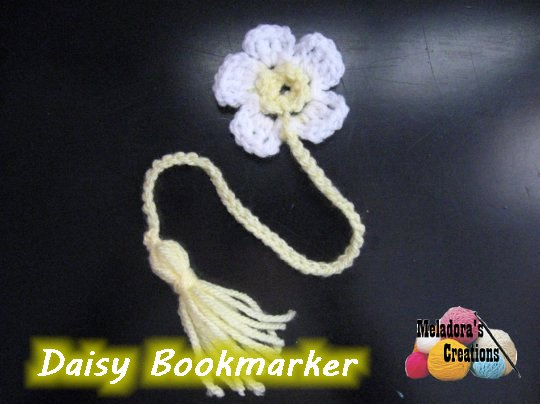
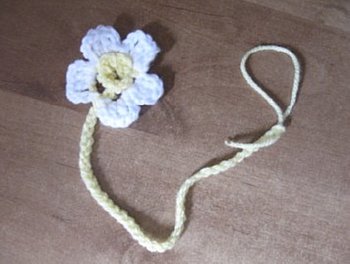
Daisy Book Marker – Free Crochet Pattern
Please don’t forget to Pin this onto your favorite crochet boards!
This page contains affiliate links
For this project you will need
HOOK: 3.5 mm hook, size E US
YARN: worsted weight yarn. 4 ply US (10ply AU)
Cardboard or book, CD case, something to use to wrap around to make the tassel
ABBREVIATIONS
(click on link to find tutorials)
ch = Chain
sl st = Slip Stitch
st = Stitch
SC = Single Crochet
DC = Double Crochet
Repeat what’s in between * for rest of round.
THE VIDEO TUTORIAL (Old crochet Tutorial)
All my Video Tutorials
If you haven’t yet, take a moment to subscribe to my videos on YouTube to have easy access to all my videos and playlist @meladora1 on YouTube
MAKING THE CENTER OF THE FLOWER AND DAISY
To Start
ch 5 and sl st into beginning chain to for a ring.
Round 1
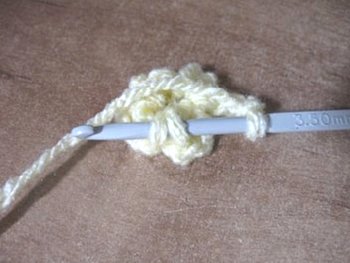
Ch 3 and sl st into center of ring (working over your tail) do this 3 more times for a total of 4 small little petals.
Round 2
For this round you will be using the slip stitches, but go from the back as shown in the picture below. *Ch 4 and then sl st into the back stitches of the next sl stitches. Repeat 3 more times for a total of 4 ch 4 spaces on the back of the flower. Time to switch colors!
Round 3
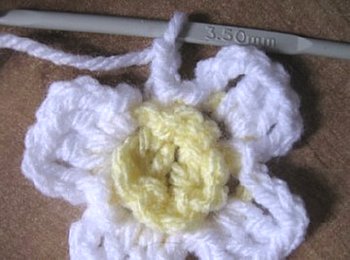
Cut yarn and switch to white.
Slip stitch your white yarn into one of the ch 4 spaces from the previous round. *ch 3 (counts as 1st stitch) then DC 2 into same ch 4 space. ch 3 and sl st to into the same ch 4 space to end this petal. Then sl st into next ch 4 space * repeat for the remaining ch 4 spaces.
At the end of the round, sl st to the small space to the left. (Where you made your first ch 4 and sl st in between the petals) and ch 3, DC 2 ch 3 to add another petal in between giving you 5 petals total. Cut yarn.
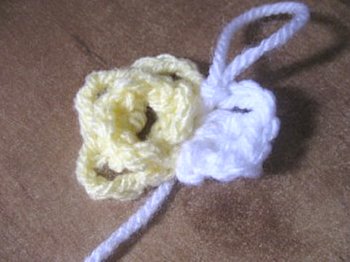
NOTE: UPDATE: Attach the yarn behind the middle petal you just made. Not between the two bottom petals like shown in the picture below, because when you use the book marker it will lay upside down. So you must attach it to the flower behind the top petal, so that when you use it, it will lay right side up on the book, and not upside down.
Attach the yarn in between the two bottom petals and chain 40 to 45. If yarn is thicker or if the book you’re reading is longer in length. This is with regular size paper back in mind. On your 40th ch pull yarn to leave a loop open to attach the tassel to. Like shown in picture below.
Do not attach it like shown above, but attach it behind the top middle petal.
MAKING THE TASSEL
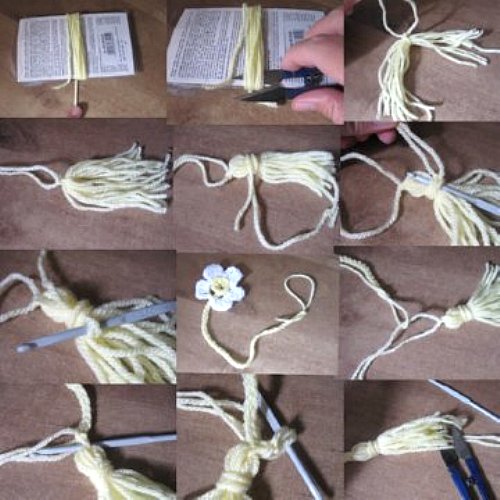
Find something that is flat, or cut a piece of cardboard that measures 8 cms or 3 inches wide to wrap your yarn around.
Holding on to the tail, wrap your yarn around 10 times (5 times if using two strands of yarn) and cut your yarn on the same side where you started. Now same side cut along the wrapped yarn.
Now lay your yarn out flat and cut another piece of yarn, better to be to long than to short, place in the center of the strings of yarn and use it to type them together. Leave this tails at the top as you fold your tails in half.
Now cut another piece of string, again better to have to log than to short, and holding the string with one hand, wrap the yarn around about 4 or 5 times around the top of the tassel to make a head, not to tightly. Tie your string.
Now use your hook to feed these tails through the wrapped string you just tied to make the head.
Attach your original strings to the open chain you left before and tie them all together then feed those tails through the top connection
Cut tail ends to even them out and your done!
This pattern is brought to you by www.meladorascreations.com
You can sell any item made from this pattern and link back to my page or videos, but you do not have permission to copy and paste my pattern anywhere online. ©Copyright 2023, All Rights Reserved
PLEASE READ BELOW!
If you’d like to see my channel stay and grow, please consider becoming a patron.
Or you could make a one time donation through PayPal. Thank you so much for your support! God Bless!