
This easy crochet purse is so simple that it will be your daughter’s first crochet purse! You can make this purse using a H / 5 mm hook with worsted weight yarn if you like, but I since my daughter wanted to add patched to it afterwards I decided to go with yarn that could withstand the heat without melting.
This Crochet Purse pattern uses Jean yarn. The cool thing about this yarn is that it can be ironed! So you can buy patches and really give your bag a unique look. Plus it was great family time as we went to the store and got to look through lots of patches together.
Find more crochet stitches here on the category Bags & Purses
Simple Crochet Purse – Free Crochet pattern, pictorial and video tutorial
Please don’t forget to Pin this onto your favorite crochet boards!
This page contains affiliate links

Supplies & yarn
- HOOK: 4 mm hook or size G hook for the US
- YARN: I went to the yarn store to get some supplies this summer and my daughter came with me. When we were there the lady told me about this new yarn they had called jeans yarn. Here is another color.
My skein was 100 grams so you would need to get two 50 gram skeins.
Each skein is 55% cotton and 45% pac and 160 meters \ 175 yards long

It does feel like jeans when you make something from it! It’s tough like jeans but soft like jeans too. So it’s perfect for bags! My daughter instantly started sharing her love to have a bag made from it. So I told her if she wants to design a bag, then we can come back and she can pick out the colors and stuff for it.
She set to work! This is what she came up with and this is what we made.
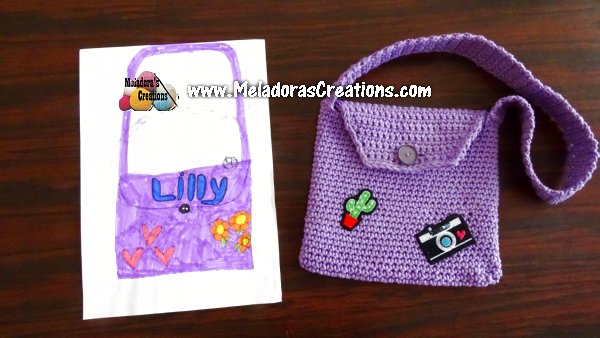
She saw some iron on patches and I thought to myself “patches go great with jeans!” so I let her grab her favorites ones to make this purse more special to her.
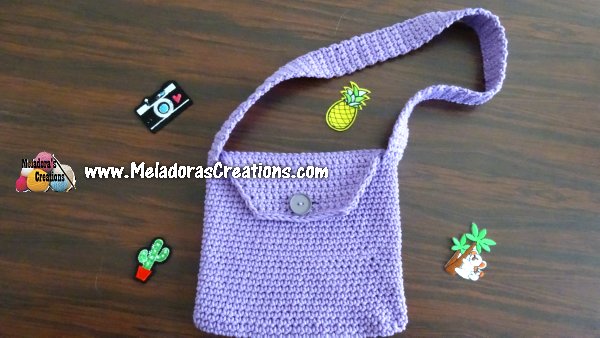
So patches are optional, but you will need a button and a tapestry needle and at least 1 stitch marker.
ABBREVIATIONS
(click on link to find tutorials)
ch = Chain
sl st = Slip Stitch
st = Stitch
sk = Skip
beg = beginning
YO = Yarn Over
SC = Single Crochet
DC = Double Crochet
SCFS = Single Crochet foundation stitch
Sc dec = single crochet decrease
* = Repeat what’s in between * for rest of round.
THE VIDEO TUTORIALS:
All my Video Tutorials
If you haven’t yet, take a moment to subscribe to my videos on YouTube to have easy access to all my videos and playlist @meladora1 on YouTube
PDF Pattern with Pictures
You can find the PDF version of my pattern with pictures on Ravlery Thank you very much for all you do to support my channel.
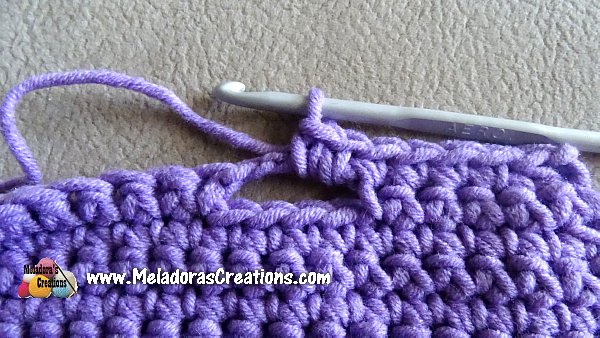
To Start
Do 28 SCFS’s. Sc 2 in the last stitch you created, (should be 3 sts total in st) this will create your corner, pivot your work and start single crocheting down the bottom stitches. SC 3 in last st on this side too. You should have 58 ch’s around. 58 sts from the 28 + 28 for both sides of the row. + 2 more for the extra sc in each corner. (at the end of the row when you pivot.)
Round 1
sc in first st and place a marker to mark your beginning stitch. We’ll be working in one continuous round now.

Rounds 2 – 29
sc in all sts. Make sure your stitches are tight, think of it like your making a Amigurumi doll and try to keep your stitches tight. If not then as you make rows 2 & 3 it will start to get wider, and you want to prevent it from getting to wide.
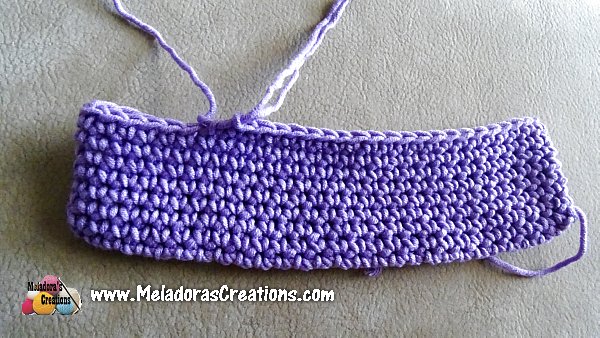
At the end of row 29 you should have a double sided piece that measures 18 cms or 7 inches.

Also want to lay your piece flat and stop on the very last stitch on the end. Mark the beginning stitch on this side as well.
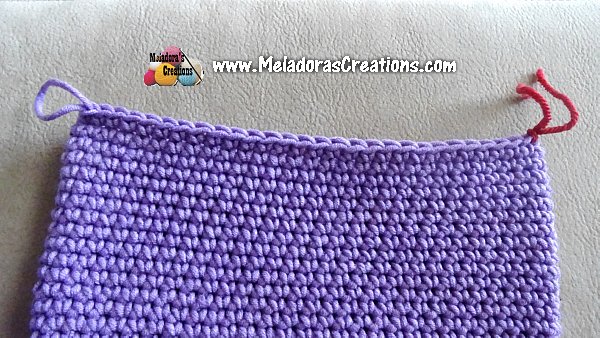
Grab up your loop again and start crocheting in rows.
THE FLAP
Row 1
sc dec using first 2 beginning sts, sc in next 26 sts, sc dec using last 2 sts. We’ll be crocheting every other row using this method. Ch 1 and turn (26 sts)
Row 2
sc in all 26 sts, ch 1 and turn
Row 3
sc dec, sc in 22, sc dec, ch 1 and turn (24 sts)
Row 4
sc in all 24 sts, ch 1 and turn
Row 5
sc dec, sc in 20, sc dec, ch 1 and turn (22 sts)
Row 6
sc in all 22 sts, ch 1 and turn
Row 7
sc dec, sc in 18, sc dec, ch 1 and turn (20 sts)
Row 8
sc in all 20 sts, ch 1 and turn
Row 9
sc dec, sc in 16, sc dec, ch 1 and turn (18 sts)
Row 10
sc in all 18 sts, ch 1 and turn
Row 11
sc dec, sc in 14, sc dec, ch 1 and turn (16 sts)
Row 12 – Making button hole
- If big button – sc 6, ch 4, skip 4, sc 6, ch 1 and turn
- If small button – sc 7, ch 2, skip 2, sc 7, ch 1 and turn

Row 13
- If big button – sc in 6, sc 4 ON TO ch, sc 6, ch 1 & turn
- If small button – sc in 7, sc 2 ON TO ch, sc 7, ch 1 & turn
Row 14
sc in all 14 sts. Cut your yarn.
I re attached my yarn on the side of the flap and did a very loose row of slip stitches to create the border.

The STRAP
Attach your yarn in the same stitch as your flap. Single crochet 5 sts over. CH 1 and turn, sc in all 5 sts. Do this for 90 rows total.

Then when you’re ready to attach, line it up with the row on the other side. Mark it as well if you need too. Your strap should be the piece on the inside with the row of the purse on the outside as shown in the picture below.

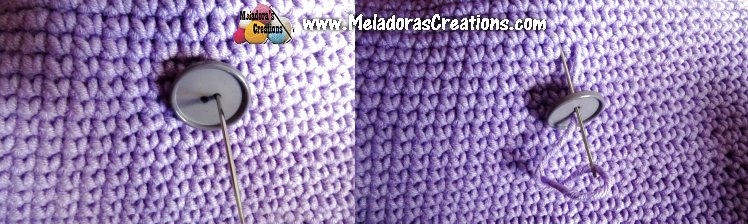
Your Button
To get an idea where to sew your button, just hold the flap down and insert your hook. Hold the place here by using a stitch marker.

Leave a tail when you thread your tapestry needle. Come from inside the purse out, then back in again through another hole of your button. Make sure you end your sewing on the inside of your bag and leave a tail here too. Tie a few knots and hide your tails.
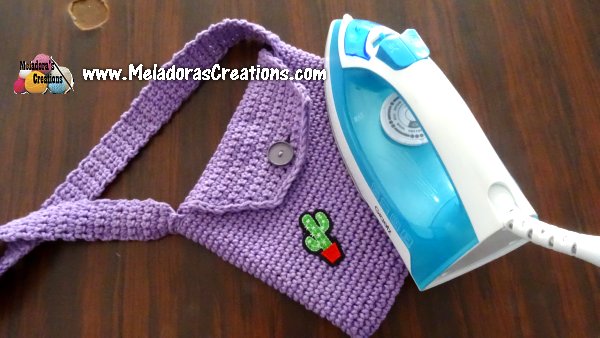
Iron on your patches or sew on your motifs and your purse is done!
This pattern is brought to you by www.meladorascreations.com
You can sell any item made from this pattern and link back to my page or videos, but you do not have permission to copy and paste my pattern anywhere online. ©Copyright 2024, All Rights Reserved
PLEASE READ BELOW!
If you’d like to see my channel stay and grow, please consider becoming a patron.
Or you could make a one time donation through PayPal. Thank you so much for your support! God Bless!
Fantastic! Happy Holidays 🙂
My daughter still uses it as her main bag. It’s a keeper!
A pleasure. Thanks so much for visiting 🙂
This is such a cute idea. 🙂 Thanks for sharing! <3
Love this little bag! Such a cute idea for Christmas gifts!
Very cute! My granddaughter will love it.