
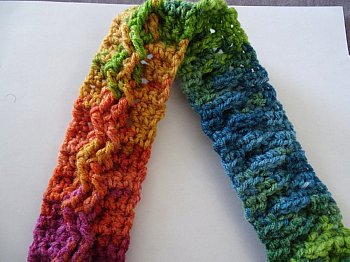
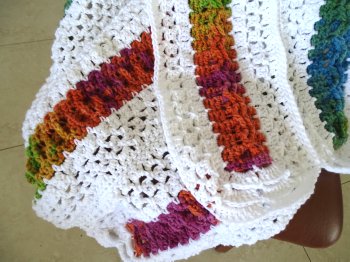
Mile a Minute Afghan crochet blanket that uses the Celtic Weave stitch or Interweave stitch to this beautiful texture. This crochet blanket is made in strips and each strip starts in rows then moves to in rounds. The center is a variegated color that really pops and is surrounded by white which makes the color stand out more. Use whatever combinations of color as you wish and I’d love to see your pictures!
You can find more afghan patterns under the category Afghans
For more about this stitch on the category Crochet Stitches
Mile a Minute Celtic Weave Afghan – Free Crochet Pattern
Please don’t forget to Pin this onto your favorite crochet boards!
This page contains affiliate links

For this project you will need:
- HOOK: Any size but I used 5 mm hook or size H hook for the US
- YARN: 6 skeins of worsted weight yarn, 4 ply US, 10 ply AU to use for the center of Afghans (Shown in Variegated Yarn) 100 grams / 3.5. oz – 210 meters / 230 yards
11 skeins of worsted weight yarn, 4 ply US, 10 ply AU to use to crochet around the center pieces (Shown in White) 100 grams / 3.5. oz – 210 meters / 230 yards
This afghan is made to fit a twin / full size bed. But you can make the strips as long or as short as you want. Would make a nice baby blanket or pillow.
NOTE: This afghan is worked in strips and pattern begins with the center of the strip show in variegated colors in the display picture. The center stripe is worked back and forth in rows. The outside of the strip is worked in rounds.

ABBREVIATIONS
(click on link to find tutorials)
ch = Chain
sl st = Slip Stitch
st = Stitch
sk = Skip
dec = decrease
beg = beginning
YO = Yarn Over
sc = Single Crochet
dc = Double Crochet
HDC = Half Double Crochet
TRC = Triple Crochet
Repeat what’s in between * for rest of round.

THE VIDEO TUTORIALS:
RIGHT HANDED VERSION
LEFT HANDED VERSION
All my Video Tutorials
If you haven’t yet, take a moment to subscribe to my videos on YouTube to have easy access to all my videos and playlist @meladora1 on YouTube

PDF Pattern with Pictures
You can find the PDF version of my pattern on Ravlery Or my shop on Etsy. Thank you very much for all you do to support my channel.
MAKING THE CENTER STRIP
To Start
Ch 10
Row 1
Dc in 3rd ch from hook. Dc in rest of sts. Ch 1 and turn ( 8 sts )
Row 2
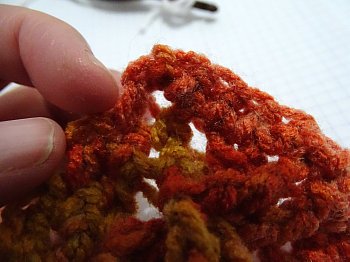
HDC in first two stitches, then skip two stitches and TRC on the post of the 5th and 6th Dc. Then going in from behind the TRC’s that you just did, back up and do TRC in the two dc’s that you skipped which were the 3rd and 4th Dc. Do this by pulling the stitch upward before working your stitch on it. Use pictures below to help you understand.
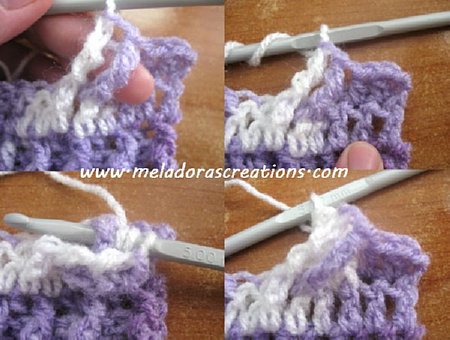
Repeat for the row, HDC in last two stitches.
Row 3
Sc in all stitches, ch 1 and turn
Row 4
HDC on the first 2 stitches. Then TRC on the post of the next two TRC’s, then back up and TRC on the two TRC’s. Do this by pulling the Stitches forward. Continue this for the row and ch 1 and turn.
Round 5
Sc in all stitches, ch 1 and turn
Repeat rows 2 – 5 until desired size is reached.
NOTE: Be sure to end your strip on after a SC row.
Now grab up the color you want to use for the outside of the strip.
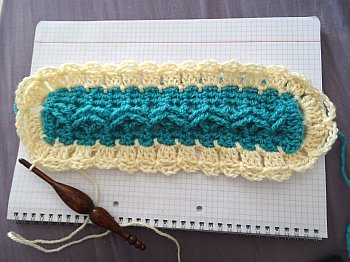
MAKING THE OUTSIDE OF STRIP
Attach your new color in the top left corner under the first DC.
We will be working down the side of the strip first.
Round 1
* ch 3 skip 2 sts and sl st in next st * Repeat for the whole side until you reach the top / bottom of the strip.
When you reach the top / bottom of the strip, you want to chain 5, skip 2, ch 5 skip 3 slip stitching in the very last stitch.
Then for the corner make sure you sl st in the bottom of the DC to create a loop for each corner. Do this for all corners of the strip.
When you reach the beginning again, make sure to create this same corner loop for the beginning as well. Slip st where I’m showing you here in this picture below.
Round 2
sl st into first ch 3 space then ch 3 and DC 2 in this space. DC 3 in the following ch 3 space and in all ch 3 spaces down the sides.
NOTE: If it’s ruffling some it’s okay, you can fix this on round 4 round.
When you reach the top / bottom of the strip you want to DC 5 in the two ch 5 spaces at the top.
Sl st in the top of the beg ch 3 to end round.
Round 3
Ch 4 and sl st int the space between the DC clusters from the last round.
(This is like the ch 3 row we did before, only we are doing ch 4’s and sl stitching in between the DC clusters. )
When you reach the Top / Bottom ends of the strip, you want to ch 7 and sl st in between.
NOTE PATTERN CHANGES SLIGHTLY HERE + TIP!
I have tried this pattern with yarn that ranged from the thinner to the thicker side of worsted weight 4 ply / 10 ply AU and I have found these alterations in the pattern will help your strips stay flatter. So depending on what size your yarn is leaning toward, thinner or thicker, follow the pattern as needed, but it is by no means set in stone. Once your start your second round of 3 DC”s and if it’s not working for you, feel free to stop and make adjustments to the amount of DC’s your adding in the ch spaces. I had to rip mine out several times until I found the correct combination that worked with the way I crochet and the yarn I was using, but once you have got the right combination, the rest of the strips will go fast and fun!
Round 4
THINNER YARN:
Sl st into first ch 4 space then ch 3 and DC 2 in this space. DC 3 in the following ch 4 space and in all ch 4 spaces down the sides.
THICKER YARN:
Recommendation to try first, make changes if you need.
sl st into first ch 4 space then ch 3 and DC 1 in this space. DC 2 in the following ch 4 space and in all ch 4 spaces down the sides.
End are done the same with both patterns:
When you reach the top / bottom of the strip you want to DC 7 in the 2 ch 7 spaces at the top.
Sl st in beg ch 3 to end round.
Round 5
Ch 4 and sl st int the space between the DC clusters from the last round. On the top / bottom of strip ch 9.
Round 6
THINNER YARN:
Sl st into first ch 4 space then ch 3 and DC 2 in this space. DC 3 in the following ch 4 space and in all ch 4 spaces down the sides.
THICKER YARN:
Recommendation to try first, make changes if you need.
sl st into first ch 4 space then ch 3 and DC 1 in this space. DC 3 in the following ch 4 space and then keep alternating as s, DC 2 in next space, DC 3 in following.
End are done the same with both patterns:
When you reach the top / bottom of the strip you want to DC 9 in the 2 ch 9 spaces at the top.
Sl st in the beg ch 3 space and cut your yarn.
HOW I SEWN MINE TOGETHER
I used the Single Crochet Method of having both pieces with the wrong sides of the strips facing each other, good sides facing out, and starting in the first stitch on the side, insert your hook into it and to it’s equal on the other strip your sewing together and do a single crochet.
Single crochet to sew them together until you reach the last stitch on the side. Don’t sewn on the top / bottom of the strip.

Sewing this way leaves a nice ridge of texture in between the pieces sewn.
This pattern is brought to you by www.meladorascreations.com
You can sell any item made from this pattern and link back to my page or videos, but you do not have permission to copy and paste my pattern anywhere online. ©Copyright 2024, All Rights Reserved
PLEASE READ BELOW!
If you’d like to see my channel stay and grow, please consider becoming a patron.
Or you could make a one time donation through PayPal. Thank you so much for your support! God Bless!
Sorry, I don’t know.
I know this is an old pattern, but can you tell me what brand and colorway the variegated color is in the center of this Mile a Minute Celtic Weave Afghan is? I LOVE the colors. Thank you.