This Moss Stitch Beanie Crochet Tutorial comes with many pictures on the PDF to teach you to how to Crochet this Wide Band Beanie using the Moss Stitch with a pom pom. This makes a great beanie for men as well! As well as tutorials for both right and left handed.
Pattern is in teenager to adult size but can easily be adjusted by changing the size of the beginning band. I show you how to do this in the pattern and tutorial.
Find more crochet stitches here on the category Crochet Stitches.
Or more Beanie patterns here Crochet Beanies
Other Patterns that use this stitch:
Moss Stitch Beanie – Free Crochet Pattern and Video Tutorials
Please don’t forget to Pin this onto your favorite crochet boards!
This page contains affiliate links

For this project you will need
- HOOKS: 5mm hook (H) and a 5.5mm hook (I)
- YARN: Two colors different colors of worsted weight yarn, 4 ply for the US and 10 ply for AU
- A stitch marker
- tapestry needle
ABBREVIATIONS
(click on link to find tutorials)
ch = Chain
sl st = Slip Stitch
HDC = Half Double Crochet
CS = Crab stitch
sts = Stitches
flo = front loops only
Repeat what’s in between * for rest of round.
THE VIDEO TUTORIALS:
All my Video Tutorials
If you haven’t yet, take a moment to subscribe to my videos on YouTube to have easy access to all my videos and playlist @meladora1 on YouTube
PDF Pattern with Pictures
You can find the PDF version of my pattern with pictures on Ravlery
Or my shop on Etsy. Thank you very much for all you do to support my channel.
MAKING THE RIM
Use the 5 mm \ H hook
To start:
ch 12
Row 2
sc in second ch from hook and in all sc’s (11) ch 1 and turn
Row 3
working in front loops only, sc in (flo) in all sts (11) ch 1 and turn
repeat row 3 until you have 60 rows total, then sl st to sew both ends of the piece to form a ring.
Don’t disconnect your yarn after sewing, just ch 1 and we’re going to start using the side of the stitches now to make the hat portion of the pattern.
Make sure to put 2 single crochets between each row of ribbing. My thumb below shows the stitches that I mean.
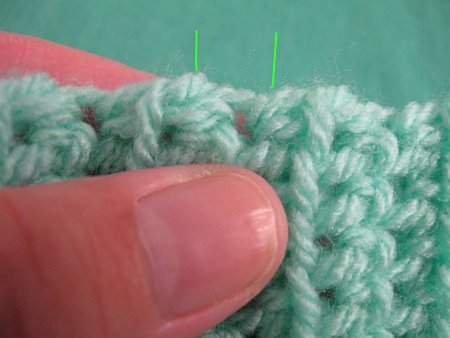
Once you have 2 single crochets in between each area as indicated above (you should have 60 sts)
sl st into beginning sc and ch 1.
STARTING THE HAT
Change to the size to 5.5 mm \ I hook, and change colors
For this round with we be working in the front loops of the single crochets only
Round 1
CS using front loops only all the way around (60 sts) Place marker below to mark beginning of round.
If you need help a better closer video tutorial with the crab stitch, here is a video tutorial to help you.
Round 2
Now sc in all of the back loops you didn’t use from the previous row.
Round 3
Now on to the fun part, the moss stitch! The moss stitch is done in rows, so you will need to turn your work every round.
Ch 1 and in same stitch do a HDC, next stitch do a sl st, repeat til you come up to your marker again (hdc, sl st) sl to into last stitch to join. ch 1 and turn your work (60 sts)
Round 4
ch 1 and turn your work and HDC into the first stitch where you last slip stitched, and put a slip stitch into the stitches where you did you HDC last round. Turn your work (HDC, sl st) (60 sts)
Make sure you are slip stitching in the right stitch, NOT in the piece of yarn that is out front.
Repeat rounds 3 and 4 until you have 14 rows complete, not counting the first round of single crochets, just the moss stitch rounds.
If you need more help with the moss stitch, see this video
REDUCING THE HAT
We start to reduce our stitches now. Keep going around the hat in one continuous round, but stopping to change stitches every time you reach your marker. MAKE SURE your work is facing with the front \ good side out facing you.
Round 15
Sc 1 in the next 3 stitches then do a single crochet decrease. Repeat til you get back to your marker. (49 sts)
Round 16
Sc 1 in next 2 stitches then do a single crochet decrease. Repeat til you get back to your marker. (36 sts)
Round 17
Sc 1 in next stitch then do a single crochet decrease. Repeat til you get back to your marker. (24 sts)
Rounds 18 & 19
Do a single crochet decrease In all sts for 2 rows, ch 1 and cut yarn. Turn hat inside out and sew top hole of hat closed with tapestry needle, use tapestry needle to hide tail.
(PATTERN CHANGE)
To make this next step easier I have changed it from how I showed it in the video tutorial.
sc in each stitch and cut your yarn leaving a long tail to sew your hail together at the top and also to sew on a pom pom afterwards.
If you would like to know how to make a pom pom to attach to this hat, you can find the tutorial here. Use both colors used on the hat to give it extra pop!.
This pattern is brought to you by www.meladorascreations.com
You can sell any item made from this pattern and link back to my page or videos, but you do not have permission to copy and paste my pattern anywhere online. ©Copyright 2023, All Rights Reserved
PLEASE READ BELOW!
If you’d like to see my channel stay and grow, please consider becoming a patron.
Or you could make a one time donation through PayPal. Thank you so much for your support! God Bless!