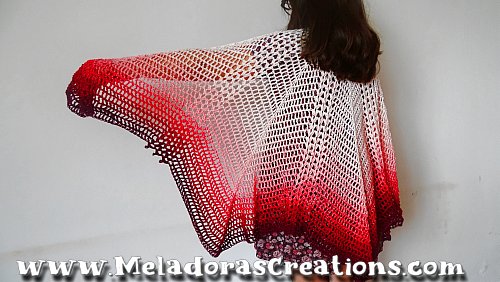
The Flutterby Effect Butterfly Shawl Crochet Pattern is the easiest one yet. It’s a single row repeat!
I really enjoyed making this Butterfly Shawl! I was sad to see it done lol. I really wanted to keep working on it. It’s because it’s sooooo simply to do. It’s just a one row repeat and the design is super easy to do and fun to watch grow and spread out….like wings!
I can’t tell you how happy I was to be able to pick up my hook again and start designing a shawl after I over did it and was having pain in my arms and shoulders. But the break gave me lots of time to think about what I wanted to do for the next shawl. I knew I wanted to stay in the pattern of how I’ve been designing and design a XL again after the release of the smaller Butterfly Net Shawl I made for my daughter.
So I thought about the things I liked about the shawls I’d made so far and decided I wanted to make myself a shawl similar to the wildly popular Bat-terfly shawl I did earlier in the year. So I took the pointy shape of that one and combined it with this really cool stitch I taught several years back that I called the Leaflet crochet stitch. I’ve been looking for something to use it on and this just seemed perfect!
I also made a page just for the Butterfly Shawls so you can go see all of them encase you’ve missed any. ALL of the Butterfly Shawls
Find more crochet stitches here on the category Crochet Shawls and Ponchos
The Flutterby Effect Butterfly Shawl – Free Crochet Pattern & Tutorials
Please don’t forget to Pin this onto your favorite crochet boards!
This page contains affiliate links

My Shawl Measured
- Wide – 160 cms \ 63 inches
- Tall – 72 cms \ 28 inches
For this project you will need:
- HOOK: 4 mm hook or size G hook for the US
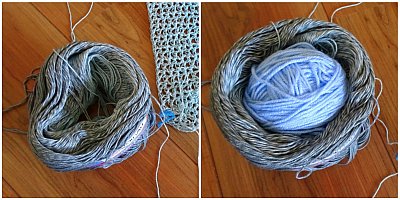
- YARN: I used a Yarn cake from YarnArt cake
Content: 55% Organic Cotton 45% Anti Pilling Acrylic
- Ball Weight: 250 g (8.8 oz)
- Yarn Weight: 1 : Fingering
- Yarn Length: 1000 m (1093 yd)
YARN: I used is a 1000 meter Yarn cake from YarnArt’s “Flower” collection. #269


Gauge
is 3 sts per inch or 2.5 cms

TIP
when using Yarn Cakes: Add a ball of yarn in the middle before storing. It will prevent the cake from collapsing.


ABBREVIATIONS
(click on link to find tutorials)
ch = Chain
sl st = Slip Stitch
st = Stitch
sk = Skip
beg = beginning
YO = Yarn Over
DC = Double Crochet
FPDC = Front Post Double Crochet
BPDC = Back Post Double Crochet
TC – Triple Crochet
LCS – Leaflet Crochet Stitch
Peak = 4 Double crochets
Repeat what’s in between | for # amount of times indicated.
Repeat what’s in between * for rest of round.
THE VIDEO TUTORIALS:
All my Video Tutorials
If you haven’t yet, take a moment to subscribe to my videos on YouTube to have easy access to all my videos and playlist @meladora1 on YouTube
PDF Pattern with Pictures
You can buy the ad free PDF version of my pattern with pictures on Ravelry or Etsy to support this channel. Either way thank you for being here and for all you do to support my channel.
Or find the Ebook of all 10 Shawl patterns here
Row 1
ch 3 and DC 8 in 3rd ch from the hook. Ch 2 and turn
Row 2
Ch 2 counts as first DC. Dc in 1st st and DC 2 in all sts. Ch 1 and turn.
Row 3
FPDC on 1st DC of row * sk a st, DC 2, ch 1, DC 2 in next st. sk a st. FP on next DC * repeat for row. Skip the ch 2 on the end. CH 1 and turn.
Row 4
*BPDC on BPDC from last row. DC 2 in between the post’s of the next 2 sts, not in the st itself. Then DC 2, ch 1, DC 2 in middle space. Then again put 2 DC’s in between the next DC’s * repeat for row. CH 1 and turn.
Row 5
*FPDC on FPDC | skip next 2 DC’s and DC 2, Ch 1, DC 2 in next space| repeat 2 more times * ch 1 and turn
Row 6
*BPDC on BPDC | sc in next DC and ch 5, skip the DC, ch 1, DC and sc in next st. | repeat 2 more times | * CH 1 and turn.
Row 7
*FPDC on FPDC | sc 4 onto the ch 5. then ch 5 and sc 4 onto the same ch 5. This is how we will always create our LCS’s . Repeat 2 more times | * ch 3 and turn.
Row 8
The ch 3 counts as your first TRC of the row. TRC in 3 in the stitch of the BPDC. We’ll be using the ch 5’s from our previous LCS’s to create our LCS’s this row. |sc 4, ch 5, sc 4 on the ch 5 sp | repeat 3 more times. | TRC 4 in last BPDC of row. Ch 3 and turn
Row 9
Ch 3 counts as 1st TRC of row, so we will always skip the first space. From now on we will be using the spaces in between the TRC’s and not in the stitches themselves.
* TRC 4 in middle space. TRC in next sp. | LCS on ch 5 | repeat 3 more times. TRC in next sp * repeat for row. Ch 3 and turn.
You’ll always end your row the same way you begun it from now on.
Row 10
TRC in between your TRC’s * until you reach the center of the 4 TRC peak. Always create a new peak here by TRC 4 in the center to create your new peak for the next row. (place marker here) Then continue to TRC in between your TRC’s until you reach your first LCS.
IMPORTANT THINGS TO REMEMBER!
NEVER put a TRC in the space before the LCS. Only use the spaces between the TRC’s and not between a TRC and LCS.
Create your LCS’s as normal, skip the space after the last LCS and TRC in the space’s between the TRC’s*
Repeat row 10, the only different between the row now is the amount of TRC’s you’ll have before reaching your peak again. MARK these 4 TRC’s so you won’t miss putting the next 4 TRC’s in the right stitch.
And remember to NEVER put a TRC in the space before or after a LCS.
This pattern is brought to you by www.meladorascreations.com
You can sell any item made from this pattern and link back to my page or videos, but you do not have permission to copy and paste my pattern anywhere online. ©Copyright 2024, All Rights Reserved
PLEASE READ BELOW!
If you’d like to see my channel stay and grow, please consider becoming a patron.
Or you could make a one time donation through PayPal. Thank you so much for your support! God Bless!