This Free Crochet Pattern with Video tutorials will teach you how to make this Crocheted Baby Afghan that’s made of Puff Flowers and connected as you go! I’ll also show you how to crochet and attach the Flower Granny Square.
You can find more afghan patterns under the category Afghans & Baby Blankets
You can find more projects like this in the category Flowers & Grannies
Other patterns that use this same stitch
- Puff Flower Heart Motif
- Flower Table Runner
- Flower Crochet Mug Rug
- Crochet Flower Sweater
- Flower Slouch Hat
- Crochet Puff Flower Scarf
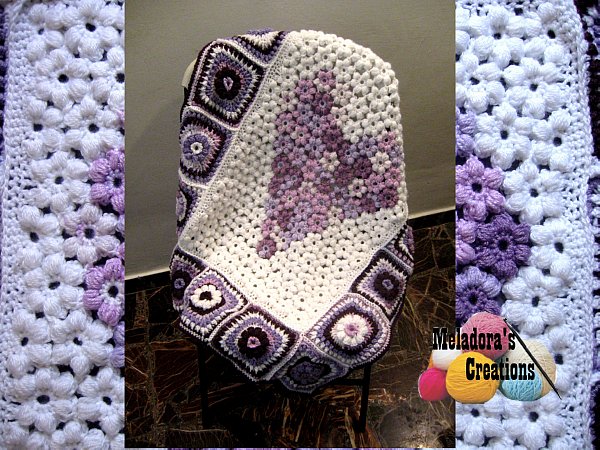
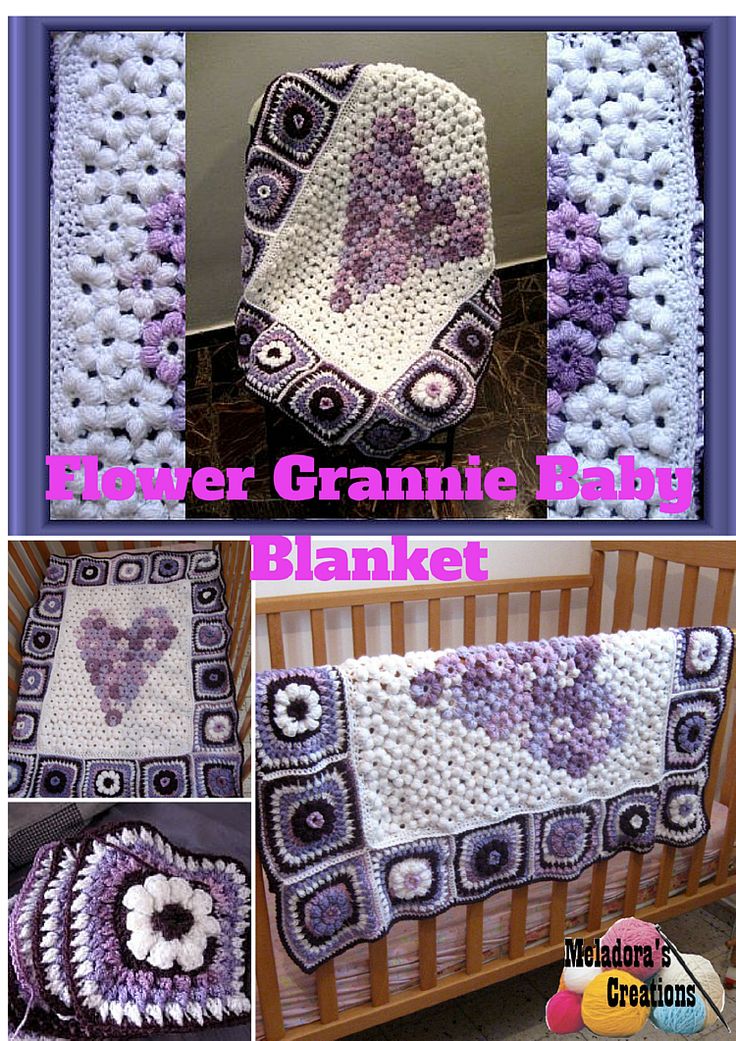
Puff Flower Baby Blanket – Free Crochet Pattern and Video tutorial
Please don’t forget to Pin this onto your favorite crochet boards!
This page contains affiliate links
For this project you will need:
- HOOK: 5 mm/ H hook and a 4.5 mm / G hook.
- YARN: 5 white skeins, 3 variegated skeins, 2 dark purple, 2 medium purple.
- Worsted Weight Yarn 4 ply US, 10 ply AU – 100 grams / 3.5. oz – 240 meters / 262 yards
- A tapestry needle
- several stitch markers
ABBREVIATIONS
(click on link to find tutorials)
ch = Chain
sl st = Slip Stitch
st = Stitch
sk = Skip
SC = Single Crochet
DC = Double Crochet
HDC = Half Double Crochet
Repeat what’s in between * for rest of round.
SIZE of my Blanket
This afghan measures 75 cms / 30 inches wide and 92 cms / 36 inches long
To Get Started
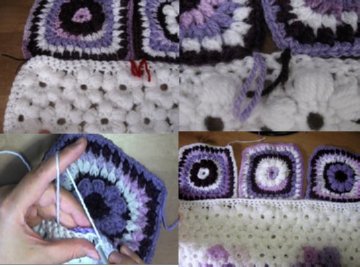
First off make your Puff Flower Heart and 18 Flower Grannies, then lets begin turning it into a baby blanket.


To begin you will need to make your Puff Flower Heart a square by adding full and half flowers. So grab your 4.5 mm / G hook and lets get started.
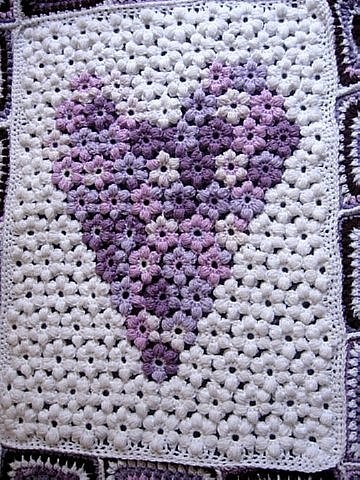
As you can see in the picture above, there are a total of 14 rows. The heart itself takes up 10 of those rows, with two rows above and below it.
The reason for the size is because we will be adding 6” squares around it, so add no more and use no less than 14 rows.
So begin where your comfortable, start to add the flowers around as you see above, use this picture as a guide.
THE TUTORIALS:
Note From Designer
“The tutorials for this project were filmed before HD cameras were available to the general public so please excuse the quality. I have been removing a lot of these old videos but I have left this one just because I know this is a difficult pattern and a bad video is still better than none at all. I hope you can get some use out of it still.”
RIGHT HANDED VERSION
Playlist for the Right handed TUTORIALS
LEFT HANDED VERSION
Playlist for the Left handed TUTORIALS
All my Video Tutorials
If you haven’t yet, take a moment to subscribe to my videos on YouTube to have easy access to all my videos and playlist @meladora1 on YouTube
PDF Pattern with Pictures
You can buy the ad free PDF version of my pattern with pictures on Ravelry or Etsy to support this channel. Either way thank you for being here and for all you do to support my channel.
STARTING FROM THE TOP
1st row: 2 half flowers and 8 full flowers
2nd row: 9 full flowers
This pattern will repeat until all 14 rows are done. Some of the flowers you already have done from making your heart, so just make sure you stay consistent. See below on how to make the half flowers
TIP: Once you have all your full flowers completed for each row, then go back and make your half flowers to flatten out your edges.
HOW TO MAKE THE HALF FLOWERS
Make your flowers the same as before, but starting with the first petal make a connection. As with all the other flowers you should have 4 connections, once you have your 4 connections, sl st into next stitch, ch 1 and cut yarn.
The pictures below are the only exception, these are the corners of the top 1st row. You still will have 4 petals for your half flower, but one petal will not be connected to anything.


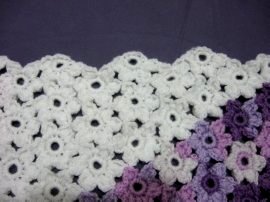
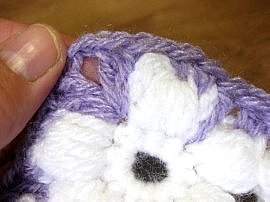
Once your flowers are done, the top of your square should be pretty even, but your sides should look something like this. Now we flatten it out by adding a border!
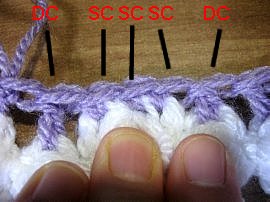
Using your 5mm/ H hook
ABBREVIATIONS
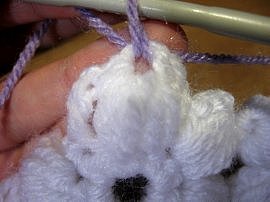
When I say ch 3 space, I mean the ch 3 to the right or left of the puff st, as the pictures show below.
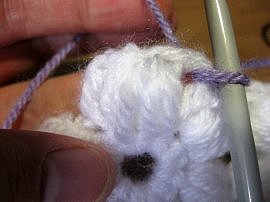

When I say Top Puff St I am talking about the stitch left at the top of the puff st as picture shows below.
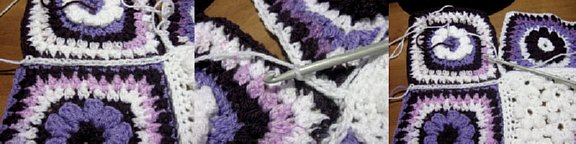
THE BORDER
Start at the top left corner, half flower, top petal. We will be working down the left side first.
HOW TO DO THE SIDE BORDERS
Do a sc attachment to the ch 3 space of the loose top petal here, then sc 2 more into first petal ch 3 space, (this will be your corner) sc 1 in the next 4 sts.
sc 1 into next petal ch 3 space. Now for the second flower, the full worked flowers are worked as follows.
Dc 2 into first petal ch 3 space, then dc 1 into the stitch in between the petals. Then dc 2 into next petals ch 3 space.
Then sc 1 in ch 3 sp, sc 1 in next 4 sts, sc 1 in ch 3 sp. See how it look in picture below.
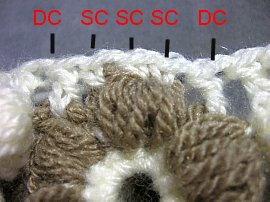
(sc 1 in ch 3 sp, sc 1 in next 4 sts, sc 1 in ch 3 sp)
(dc 2 in ch 3 sp, dc 1 middle , dc 2 in ch sp)
So normal pattern will work as follows
sc 3 in ch 3 sp (this will be your corner), sc 1 in next 4, sc 1 in ch 3 sp
*dc 2 in ch 3 sp, dc 1 middle , dc 2 in ch sp
sc 1 in ch 3 sp, sc 1 in next 4 sts, sc 1 in ch 3 sp* Repeat until last flower on this side.
FIRST CORNER
When you get to the last flower (which should be a full flower) Put 2 dc’s into the ch 3 sp of first petal, 1 dc in between the petals, for the top petal you will work 1 sc in the ch 3 space, 1 sc in top puff st and skip the next ch 3 flower space. Then in between the petals do 2 dc’s, ch 1, 2 dc’s all into same stitch, then work a sc into next ch 3 space and 1 sc on top puff connection then sc 1 into next ch 3 petal space.
So pattern for last flower goes as follows:
DC 2 in ch 3 sp, dc 1, sc in ch 3 sp, sc 1, sk a st, ( dc 2, ch 1, dc 2 ) same sp, sc in ch 3 sp, sc 1, sc in ch 3 sp
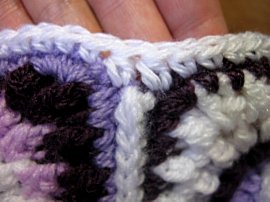
HOW TO DO THE TOP AND BOTTOM BORDERS
There are 3 petals on each flower, you will be working them as follows.
1 dc in ch 3 space on first petal, the on center petal 1 sc in ch 3 sp, sc in top puff st, sc 1 into ch 3 sp, dc 1 into ch 3 space of last petal.
So pattern will work out as follows
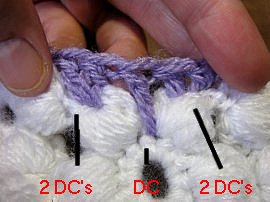
*dc 1, sc 1, sc 1, sc 1, dc 1, * repeat for whole side. See how it looks in picture below.
(dc 1, sc 1, sc 1, sc, 1, dc 1)
SECOND CORNER
When you get to the last flower on this row, you work it like this:
dc 1 into ch 3 sp, sc 1 into ch 3 sp, sc 1 into top puff stitch, sc 1 into ch 3 sp, dc 2 in the stitch in between the flowers, ch 1 and dc 2 into same stitch, then next petal work 1 sc into ch 3 space, sc 1 into top puff stitch, sc 1 into next ch 3 sp, dc into next ch 3 space,
Then continue this side as the one you did for the other side border
sc in next ch 3 sp, sc 1 into next 4 sts etc, sc in next ch 3 sp, dc into next ch 3 sp, dc 1 in between petals, dc into next ch 3 sp, etc……
When you get to next corner it should be a half flower, work flower as follows
sc in first ch 3, sc 1 in next 4 sts, sc 3 into next ch 3 space, sc in top puff connection, sc in ch 3 sp, then in last petal, the ch 3 space work a DC, then your on the start of your next flower and side.
Work this side the same as other bottom side.
Dc 1 in next ch 3 sp , sc 1 in ch 3 sp, sc 1 in top puff st, sc 1 in ch 3 sp, dc 1 in ch 3 sp, dc 1 in ch 3 sp, sc 1 in ch 3 sp, sc 1 in top puff st ,sc 1 in ch 3 sp etc……
When you get back up to your last flower, work it as normal, dc in ch 3 sp, sc 1 in ch 3 sp, sc in top puff st, then sl st into that beginning sc attachment that we did.
NOW LETS CONNECT OUR GRANNIES
You should have 3 grannies that fit across the top and 4 grannies that fit across the side, with 4 grannies to fit in each corner.
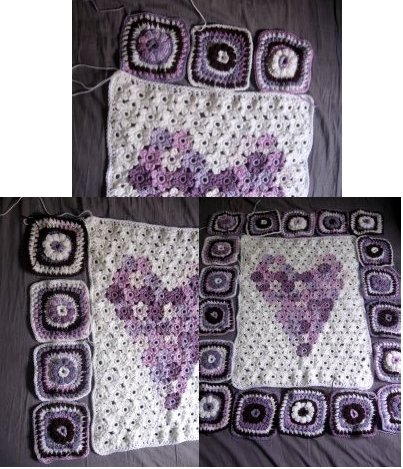
Start at the top and grab your center piece flower square and 3 grannies that you want at the top. You will need at least 2 marker holders for each granny.
And stretch them all slightly and use the marker to connect the granny to the blanket to hold it in place, if you need to re position them them do so now.
Make sure to keep side grannies as even as you can as shown in first picture below. Then sc them together by putting both sides facing one, good side up, and sc through both of them as show in picture below. Repeat for other 2 grannies.
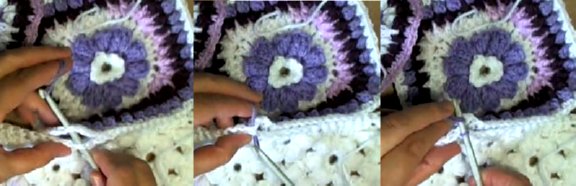
Use markers to hold grannies in place
Holding both sides together evenly, sc then together
Go down each side connecting your grannies this way, 3 on top and bottom, and 4 on the sides.
Once your finished, with your yarn still attached, sc the corner piece. Then ch 1 and cut your yarn, leaving enough yarn to be worked in later with a tapestry needle.
Now leaving yourself some extra tail before making your slip knot (so you can work it in with a tapestry needle later) sc in between the grannies. Ch 1 and again leaving some tail to be worked in later.
Repeat for all corners and grannies until all are sewn together.
Once done take this time to hide all your tails.
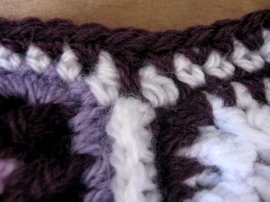
MAKING THE OUTSIDE BORDER
Use 5mm / H hook
First round, choose your color (for mine I choose white) and sc attach it to one of the corners of the blanket, do 2 more sc’s in this same corner st. (From now on all corners will be 3 sc’s into the very corner stitch.)
sc until you get to the stitch right before the granny connection, and do a HDC before and after the connection. As shown below.
Repeat this all the way around, remember to put 3 sc’s into each corner stitch. Ch 1, cut yarn. There isn’t a accurate stitch count here because everyone will sew the grannies one a bit different.
For last round, change to another color and do a sc attachment into the corner, and sc 2 more into same st. sc until your reach the granny connection again, this time dc in between then HDC’s, using the back stitch of the connection yarn.
It covers the space here and leaves a nice color effect. Repeat for whole round, remembering to sc 3 into very corner space. Ch 1, cut yarn, work in ends.
This pattern is brought to you by www.meladorascreations.com
You can sell any item made from this pattern and link back to my page or videos, but you do not have permission to copy and paste my pattern anywhere online. ©Copyright 2024, All Rights Reserved
PLEASE READ BELOW!
If you’d like to see my channel stay and grow, please consider becoming a patron.
Or you could make a one time donation through PayPal. Thank you so much for your support! God Bless!