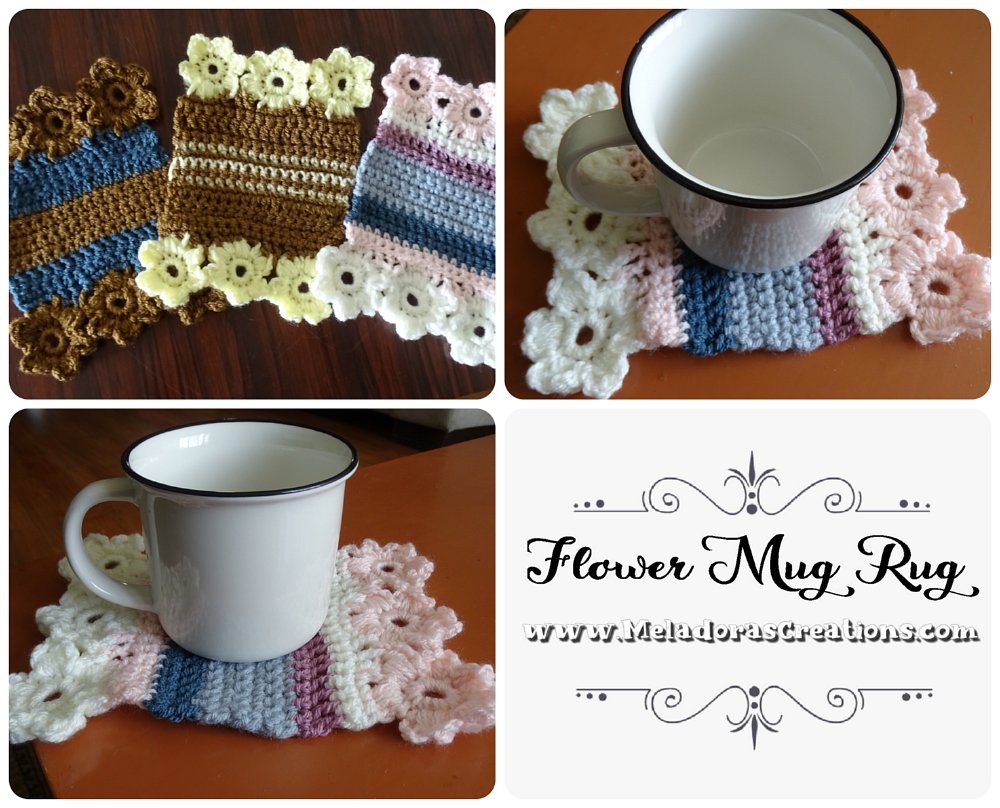
I found a winning crochet pattern with this Flower Crochet Mug Rug and they make great stash busters and gifts too!
I’ve crocheted a few Mug Rugs in the past, but I didn’t like them because when I would set something to hot or something that created condensation, my crochet mug rug would be to light and would stitch to the bottom of my mug! So I would quickly stop using them. I always thought if I could just add some weight to the outside it would help this not happen so easily.
So I tested this idea with some scrap yarn and I found if I added a row of DC’s that it created a weakness point along the sides which combined with the weight of the flowers would prevent this from happening most of the time. As long as the mug wasn’t to soaking wet from condensation. Which is exciting for me because as you know I LOVE flowers and Butterflies and I find a way to use them anytime I can.
You can find more projects like this in the category Crochet for the Home
You can find more projects like this in the category Scrap Yarn Patterns
You can find more projects like this in the category Flowers & Grannies
Other patterns that use this same stitch
- Flower Granny Baby Blanket
- Puff Flower Heart Motif
- Flower Table Runner
- Crochet Flower Sweater
- Flower Slouch Hat
- Crochet Puff Flower Scarf
Flower Mug Rug – Free Crochet Pattern and Video tutorial
Please don’t forget to Pin this onto your favorite crochet boards!
This page contains affiliate links

For this project you’ll need:
- HOOK: 5 mm hook or size H hook for the US
- YARN: I used worsted weight yarn, 4 ply US, 10 ply AU
SIZE
Measuring from one flower tip to the other, the is 8 inches or 20 ½ cms wide and length is 5 ½ inches or 14 cms. If this is to big for you then you can change to a smaller hook size, or do fewer rows in the middle section.

ABBREVIATIONS
(click on link to find tutorials)
ch = Chain
sl st = Slip Stitch
beg = beginning
SC = Single Crochet
DC = Double Crochet
YO = Yarn Over
PS = Puff stitch
Repeat what’s in between * for rest of row.
PDF Pattern with Pictures
You can find the PDF version of my pattern with pictures on Ravlery Or my shop on Etsy. Thank you very much for all you do to support my channel.
MAKING THE 6 PETAL PUFF FLOWER
To Start:
ch 4, sl st into beginning ch to form a loop
Round 1
ch 1 and sc 12 in loop, sl st into beginning st
Round 2
ch 3 start your puff stitch in same stitch , YO and draw up 3 times for first part of stitch (7 loops on hook)
Then YO and draw up 3 times in next stitch (13 loops on hook)
Pull through all 13 loops. Ch 3, sl st into same st.
Then sl st into next and ch 3. repeat next PS petal.
Finish the first flower. You should have 6 petals. Sl st in last st and ch 1 , cut yarn. Then continue to make your next flower.
Create 3 of your petals and on the fourth you will need to make a connection. Start your fourth petal as usual, but after pulling through all 13 loops of your PS, grab your other flower that you made.
Connect using only 2 petals, making sure to leave the top and bottom petal alone, just connect to the two middle ones.
To make the connection , you will use the larger of the two connections, the left one, on the top back connections of the petal.
Sl st through this loop and the one on your hook
Then ch 3 and sl st into same stitch as Puff Stitch to finish petal as normal. Repeat this for your next petal as well. The 6th and final petal will be made without any connections, just complete the petal.
ch 1 and fasten off.
If you need more help making the connection, I have a video tutorial where I made a scarf using this technique that you can view here:
Now that all 3 are connected, you can tell that one side of the flowers are more textured and the other side is puffy. This is the front and back sides.

Time to make the Coaster
Row 1
Grab your next color and with the flowers facing the front side with the texture, you want to grab the ch 3 to the side of the PS to attach.
Sc twice in this space. Then SC into the tip of the flower, then your 4th sc goes into the next ch 3 space of the flower petal.
Now you will do 3 DC’s. The first one is crocheted into the next ch 3 space of your next petal. Then the next DC is crocheted into the space that was created when you connected your two flowers. And the final DC goes into the ch 3 of the next flower’s 1st petal.
Repeat this until you reach the last flower’s top petal, giving you 18 stitches in total.
Ch 1 and turn
Row 2
SC in all 18 sts. Ch 3 and turn
Row 3
The ch 3 counts as the first stitch. DC in rest of 17 sts. Ch 1 and turn
Rows 4 – 11
SC in all 18 sts. After your last row 11, then ch 3 and turn
Row 12
The ch 3 counts as the first stitch. DC in rest of 17 sts. Ch 1 and turn
Row 13
SC in all 18 sts then ch 1, and cut your yarn. Leave enough yarn to be hidden with a tapestry needle.
Now create your next set of 3 flowers. Repeat rows 1 and 2. Then cut your yarn leaving a long tail to use for sewing.
Line up your pieces where the flowers are facing the same way. You can place a marker on the opposite side of the row to help keep your stitches lined up and straight. Then thread your tapestry needle with the long tail you left and sew using the whip stitch to connect the two pieces.
Go under both loops when sewing so your piece will not had a stripe running along the back. Then hide your tails and enjoy your mug rug!
This pattern is brought to you by www.meladorascreations.com
You can sell any item made from this pattern and link back to my page or videos, but you do not have permission to copy and paste my pattern anywhere online. ©Copyright 2022, All Rights Reserved
PLEASE READ BELOW!
If you’d like to see my channel stay and grow, please consider becoming a patron.
Or you could make a one time donation through PayPal. Thank you so much for your support! God Bless!